集群方案:
https://kubernetes.io/docs/setup/production-environment/tools/kubeadm/ha-topology/
所有节点执行
IP地址
主机节点
说明
安装软件 k8s版本(1.30.0) containerd版本(1.6.9)
172.20.0.16
k8s-master-1
主节点1
kubectl、kubeadm、kubelet、containerd、etcd
172.20.0.17
k8s-master-2
主节点2
kubectl、kubeadm、kubelet、containerd、etcd
172.20.1.16
k8s-lb-1
负载均衡1
keepalived、haproxy
172.20.1.17
k8s-lb-2
负载均衡2
keepalived、haproxy
172.20.1.10
vip
虚拟ip
-
172.20.0.30
k8s-node-1
工作节点1
kubectl、kubeadm、kubelet、containerd
172.20.0.31
k8s-node-2
工作节点2
kubectl、kubeadm、kubelet、containerd
172.20.0.32
k8s-node-3
工作节点3
kubectl、kubeadm、kubelet、containerd
1
2
3
4
5
6
7
8
9
10
11
12
13
14
15
16
17
18
19
20
21
22
23
24
25
NEW_UUID=$(uuidgen) cat <<EOF | tee /etc/sysconfig/network-scripts/ifcfg-ens192 TYPE="Ethernet" PROXY_METHOD="none" BROWSER_ONLY="no" BOOTPROTO="static" DEFROUTE="yes" IPADDR="172.20.0.16" NETMASK="255.255.0.0" DNS1="223.5.5.5" DNS2="8.8.8.8" GATEWAY="172.20.0.1" IPV4_FAILURE_FATAL="no" IPV6INIT="yes" IPV6_AUTOCONF="yes" IPV6_DEFROUTE="yes" IPV6_FAILURE_FATAL="no" IPV6_ADDR_GEN_MODE="stable-privacy" NAME="ens192" UUID="$NEW_UUID" DEVICE="ens192" ONBOOT="yes" EOF systemctl restart network
1
2
3
4
mv /etc/yum.repos.d/CentOS-Base.repo /etc/yum.repos.d/CentOS-Base.repo.bak curl -o /etc/yum.repos.d/CentOS-Base.repo https://mirrors.aliyun.com/repo/Centos-7.repo yum clean all yum makecache
1
2
3
4
5
6
7
yum install ntpdate -y ntpdate time1.aliyun.com echo "0 */1 * * * /usr/sbin/ntpdate time1.aliyun.com" | crontab -crontab -l
1 2 3 4 5 6 7 8 9 10 11 12 13 14 15 16 17 18 19 20 21 22 23 24 25 26 27 28 29 30 31 wget http://mirrors.coreix.net/elrepo-archive-archive/kernel/el7/x86_64/RPMS/kernel-lt-5.4.278-1.el7.elrepo.x86_64.rpm wget http://mirrors.coreix.net/elrepo-archive-archive/kernel/el7/x86_64/RPMS/kernel-lt-devel-5.4.278-1.el7.elrepo.x86_64.rpm wget http://mirrors.coreix.net/elrepo-archive-archive/kernel/el7/x86_64/RPMS/kernel-lt-doc-5.4.278-1.el7.elrepo.noarch.rpm wget http://mirrors.coreix.net/elrepo-archive-archive/kernel/el7/x86_64/RPMS/kernel-lt-headers-5.4.278-1.el7.elrepo.x86_64.rpm wget http://mirrors.coreix.net/elrepo-archive-archive/kernel/el7/x86_64/RPMS/kernel-lt-tools-5.4.278-1.el7.elrepo.x86_64.rpm wget http://mirrors.coreix.net/elrepo-archive-archive/kernel/el7/x86_64/RPMS/kernel-lt-tools-libs-5.4.278-1.el7.elrepo.x86_64.rpm wget http://mirrors.coreix.net/elrepo-archive-archive/kernel/el7/x86_64/RPMS/kernel-lt-tools-libs-devel-5.4.278-1.el7.elrepo.x86_64.rpm yum remove kernel-tools kernel-headers kernel-tools-libs -y yum localinstall -y kernel-lt-*.rpm sudo awk -F\' ' $1 =="menuentry " {print i++ " : " $2 }' /etc/grub2.cfg # GRUB初始化页面的第一个内核将作为默认内核 grub2-set-default 0 # 重新生成grub2引导文件 grub2-mkconfig -o /boot/grub2/grub.cfg # 重启 reboot # 查询版本 uname -r
1 2 3 4 5 6 7 8 9 10 11 12 13 14 15 16 17 18 cat <<EOF | sudo tee /etc/sysctl.d/k8s.conf net.bridge.bridge-nf-call-iptables = 1 net.bridge.bridge-nf-call-ip6tables = 1 net.ipv4.ip_forward = 1 EOF cat <<EOF | sudo tee /etc/modules-load.d/k8s.conf overlay br_netfilter EOF modprobe overlay && modprobe br_netfilter lsmod | grep br_netfilter lsmod | grep overlay sysctl --system
1 2 3 4 5 6 systemctl stop firewalld systemctl disable firewalld sed -i 's/enforcing/disabled/' /etc/selinux/config setenforce 0
1
2
3
4
5
6
7
8
9
10
11
12
yum -y install ipset ipvsadm cat > /etc/sysconfig/modules/ipvs.modules << EOF modprobe -- ip_vs modprobe -- ip_vs_rr modprobe -- ip_vs_wrr modprobe -- ip_vs_sh modprobe -- nf_conntrack EOF chmod 755 /etc/sysconfig/modules/ipvs.modules && bash /etc/sysconfig/modules/ipvs.modules && lsmod | grep -e ip_vs -e nf_conntrack
1 2 3 swapoff -a sed -ri 's/.swap./#&/' /etc/fstab
所有主节点执行
1
2
3
4
5
6
yum install -y wget wget https://github.com/coreos/etcd/releases/download/v3.5.11/etcd-v3.5.11-linux-amd64.tar.gz tar xzvf etcd-v3.5.11-linux-amd64.tar.gz cd etcd-v3.5.11-linux-amd64mv etcd* /usr/local /bin cd ~
1
2
3
4
5
6
7
8
9
10
11
12
13
14
15
16
17
18
19
20
21
22
23
24
25
26
27
28
29
cat <<EOF | sudo tee /usr/lib/systemd/system/etcd.service [Unit] Description=Etcd Service After=network.target [Service] Type=notify ExecStart=/usr/local/bin/etcd \ --name=etcd-1 \ --data-dir=/var/lib/etcd/default.etcd \ --listen-peer-urls=http://[HOST_IP]:2380 \ --listen-client-urls=http://[HOST_IP]:2379,http://127.0.0.1:2379 \ --advertise-client-urls=http://[HOST_IP]:2379 \ --initial-advertise-peer-urls=http://[HOST_IP]:2380 \ --initial-cluster=etcd-1=http://[etcd-1_IP]:2380,etcd-2=http://[etcd-2_IP]:2380,etcd-3=http://[etcd-3_IP]:2380 \ --initial-cluster-token=123456 \ --initial-cluster-state=new \ Restart=on-failure LimitNOFILE=65535 [Intall] wantedBy=multi-user.target EOF systemctl enable etcd && systemctl start etcd etcdctl member list etcdctl endpoint health --endpoints=http://172.20.0.16:2379,http://172.20.0.17:2379,http://172.20.0.18:2379
负载均衡节点执行
1
2
3
4
5
6
7
8
9
10
11
12
13
14
15
16
17
18
19
20
21
22
23
24
25
yum install gcc readline-devel openssl-devel systemd-devel pcre-devel -y cd ~ && wget http://www.lua.org/ftp/lua-5.4.3.tar.gztar xf lua-5.4.3.tar.gz cd lua-5.4.3 && make linux && make linux test cd ~ && wget https://www.haproxy.org/download/2.4/src/haproxy-2.4.28.tar.gztar xf haproxy-2.4.28.tar.gz cd haproxy-2.4.28make ARCH=x86_64 TARGET=linux-glibc USE_PCRE=1 USE_OPENSSL=1 USE_ZLIB=1 USE_SYSTEMD=1 USE_LUA=1 LUA_INC=~/lua-5.4.3/src LUA_LIB=~/lua-5.4.3/src && make install && cd ~ cat <<EOF | sudo tee /usr/lib/systemd/system/haproxy.service [Unit] Description=HAProxy Load Balancer After=syslog.target network.target [Service] ExecStartPre=/usr/local/sbin/haproxy -f /etc/haproxy/haproxy.cfg -c -q ExecStart=/usr/local/sbin/haproxy -Ws -f /etc/haproxy/haproxy.cfg -p /var/lib/haproxy/haproxy.pid ExecReload=/bin/kill -USR2 $MAINPID [Install] WantedBy=multi-user.target EOF mkdir -p /var/lib/haproxy
https://github.com/kubernetes/kubeadm/blob/main/docs/ha-considerations.md#haproxy-configuration
1
2
3
4
5
6
7
8
9
10
11
12
13
14
15
16
17
18
19
20
21
22
23
24
25
26
27
28
29
30
31
32
33
34
35
36
37
38
39
40
41
42
43
44
45
46
47
48
49
50
51
52
53
54
55
56
cat <<EOF | sudo tee /etc/haproxy/haproxy.cfg # /etc/haproxy/haproxy.cfg #--------------------------------------------------------------------- # Global settings #--------------------------------------------------------------------- global log stdout format raw local0 daemon #--------------------------------------------------------------------- # common defaults that all the 'listen' and 'backend' sections will # use if not designated in their block #--------------------------------------------------------------------- defaults mode http log global option httplog option dontlognull option http-server-close option forwardfor except 127.0.0.0/8 option redispatch retries 1 timeout http-request 10s timeout queue 20s timeout connect 5s timeout client 35s timeout server 35s timeout http-keep-alive 10s timeout check 10s #--------------------------------------------------------------------- # apiserver frontend which proxys to the control plane nodes #--------------------------------------------------------------------- frontend apiserver bind *:${APISERVER_DEST_PORT} mode tcp option tcplog default_backend apiserverbackend #--------------------------------------------------------------------- # round robin balancing for apiserver #--------------------------------------------------------------------- backend apiserverbackend option httpchk http-check connect ssl http-check send meth GET uri /healthz http-check expect status 200 mode tcp balance roundrobin server ${HOST1_ID} ${HOST1_ADDRESS}:${APISERVER_SRC_PORT} check verify none # [...] # 启动haproxy systemctl enable haproxy && systemctl start haproxy
1 yum install -y keepalived
1
2
3
4
5
6
7
8
9
10
11
12
13
14
15
16
17
18
19
20
21
22
23
24
25
26
27
28
29
30
31
32
33
34
cat <<EOF | tee /etc/keepalived/keepalived.conf global_defs { router_id LVS_DEVEL } vrrp_script check_apiserver { script "/etc/keepalived/check_apiserver.sh" interval 3 weight -2 fall 10 rise 2 } vrrp_instance VI_1 { # 状态,主节点为MASTER,从节点为BACKUP state MASTER # 修改为你自己网卡的名字 interface ens192 virtual_router_id 51 # MASTER当中使用101,BACKUP当中使用100 priority 101 authentication { auth_type PASS # 设置好你的密码,keepalived集群当中需要保证这个值的一致 auth_pass cbfd08bd } virtual_ipaddress { # 注意这里修改为你自己的虚拟IP地址 172.20.1.10 } track_script { check_apiserver } } EOF
check_apiserver.sh
1
2
3
4
5
6
7
8
9
10
11
12
13
14
15
16
17
cat <<EOF | tee /etc/keepalived/check_apiserver.sh #!/bin/sh errorExit() { echo "*** $*" 1>&2 exit 1 } curl -sfk --max-time 2 https://localhost:${APISERVER_DEST_PORT}/healthz -o /dev/null || errorExit "Error GET https://localhost:${APISERVER_DEST_PORT}/healthz" EOF chmod +x /etc/keepalived/check_apiserver.sh systemctl enable keepalived systemctl start keepalived ip address show
所有节点执行
1
2
3
4
5
6
7
8
9
10
11
yum install wget -y wget https://mirrors.aliyun.com/docker-ce/linux/centos/docker-ce.repo -O /etc/yum.repos.d/docker-ce.repo yum -y install containerd.io-1.6.9 containerd config default > /etc/containerd/config.toml sed -i 's/SystemdCgroup = false/SystemdCgroup = true/' /etc/containerd/config.toml sed -i 's/sandbox_image = "registry.aliyuncs.com\/google_containers\/pause:3.9"/sandbox_image = ""/' /etc/containerd/config.toml systemctl enable containerd && systemctl start containerd systemctl status containerd
所有节点执行
1 2 3 4 5 6 7 8 9 10 11 12 cat <<EOF | tee /etc/yum.repos.d/kubernetes.repo [kubernetes] name=Kubernetes baseurl=https://mirrors.aliyun.com/kubernetes-new/core/stable/v1.30/rpm/ enabled=1 gpgcheck=1 gpgkey=https://mirrors.aliyun.com/kubernetes-new/core/stable/v1.30/rpm/repodata/repomd.xml.key EOF yum install -y kubelet-1.30.0 kubeadm-1.30.0 kubectl-1.30.0 --disableexcludes=kubernetes systemctl enable kubelet
选一个主节点执行
1 2 3 4 5 6 7 8 9 10 11 12 13 14 15 16 17 18 19 20 21 22 23 24 25 26 27 28 29 30 31 32 33 34 35 36 37 kubeadm config images list --kubernetes-version=v1.30.0 kubeadm config images pull --kubernetes-version=v1.30.0
选一个主节点执行
1 2 3 4 5 6 7 8 9 10 11 12 13 14 15 16 17 18 19 20 21 22 23 24 25 26 27 28 29 30 31 32 33 34 35 36 37 38 39 40 41 42 43 44 45 46 47 48 49 50 51 52 53 54 55 56 57 58 59 60 61 62 63 64 65 66 67 68 69 70 71 72 73 74 75 76 77 78 79 80 81 82 83 84 85 86 87 88 89 90 91 92 93 94 95 96 97 98 99 100 101 102 103 104 105 advertiseAddress=172.20.0.16 nodeName=172.20.0.16 vip=172.20.1.10 controlPlaneEndpoint=172.20.1.10:6443 etcd_1=http://172.20.0.16:2379 etcd_2=http://172.20.0.17:2379 etcd_3=http://172.20.0.18:2379 cat <<EOF | tee ./kubeadm-config.yaml apiVersion: kubeadm.k8s.io/v1beta3 bootstrapTokens: - groups: - system:bootstrappers:kubeadm:default-node-token token: 8t2aoi.d4e5a6g7b8i9j0k9 ttl: 24h0m0s usages: - signing - authentication kind: InitConfiguration localAPIEndpoint: advertiseAddress: $advertiseAddress bindPort: 6443 nodeRegistration: criSocket: unix:///var/run/containerd/containerd.sock imagePullPolicy: IfNotPresent name: $nodeName taints: null --- apiServer: certSANs: - $vip timeoutForControlPlane: 4m0s apiVersion: kubeadm.k8s.io/v1beta3 certificatesDir: /etc/kubernetes/pki clusterName: kubernetes controllerManager: {} dns: {} etcd: external: endpoints: - $etcd_1 - $etcd_2 - $etcd_3 imageRepository: registry.k8s.io kind: ClusterConfiguration kubernetesVersion: 1.30.0 networking: dnsDomain: cluster.local serviceSubnet: 10.96.0.0/12 podSubnet: 10.244.0.0/16 scheduler: {} controlPlaneEndpoint: $controlPlaneEndpoint --- apiVersion: kubeproxy.config.k8s.io/v1alpha1 kind: KubeProxyConfiguration mode: ipvs # iptables --- apiVersion: kubelet.config.k8s.io/v1beta1 authentication: anonymous: enabled: false webhook: cacheTTL: 0s enabled: true x509: clientCAFile: /etc/kubernetes/pki/ca.crt authorization: mode: Webhook webhook: cacheAuthorizedTTL: 0s cacheUnauthorizedTTL: 0s cgroupDriver: systemd clusterDNS: - 10.96.0.10 clusterDomain: cluster.local containerRuntimeEndpoint: "" cpuManagerReconcilePeriod: 0s evictionPressureTransitionPeriod: 0s fileCheckFrequency: 0s healthzBindAddress: 127.0.0.1 healthzPort: 10248 httpCheckFrequency: 0s imageMaximumGCAge: 0s imageMinimumGCAge: 0s kind: KubeletConfiguration logging: flushFrequency: 0 options: json: infoBufferSize: "0" text: infoBufferSize: "0" verbosity: 0 memorySwap: {} nodeStatusReportFrequency: 0s nodeStatusUpdateFrequency: 0s rotateCertificates: true runtimeRequestTimeout: 0s shutdownGracePeriod: 0s shutdownGracePeriodCriticalPods: 0s staticPodPath: /etc/kubernetes/manifests streamingConnectionIdleTimeout: 0s syncFrequency: 0s volumeStatsAggPeriod: 0s EOF
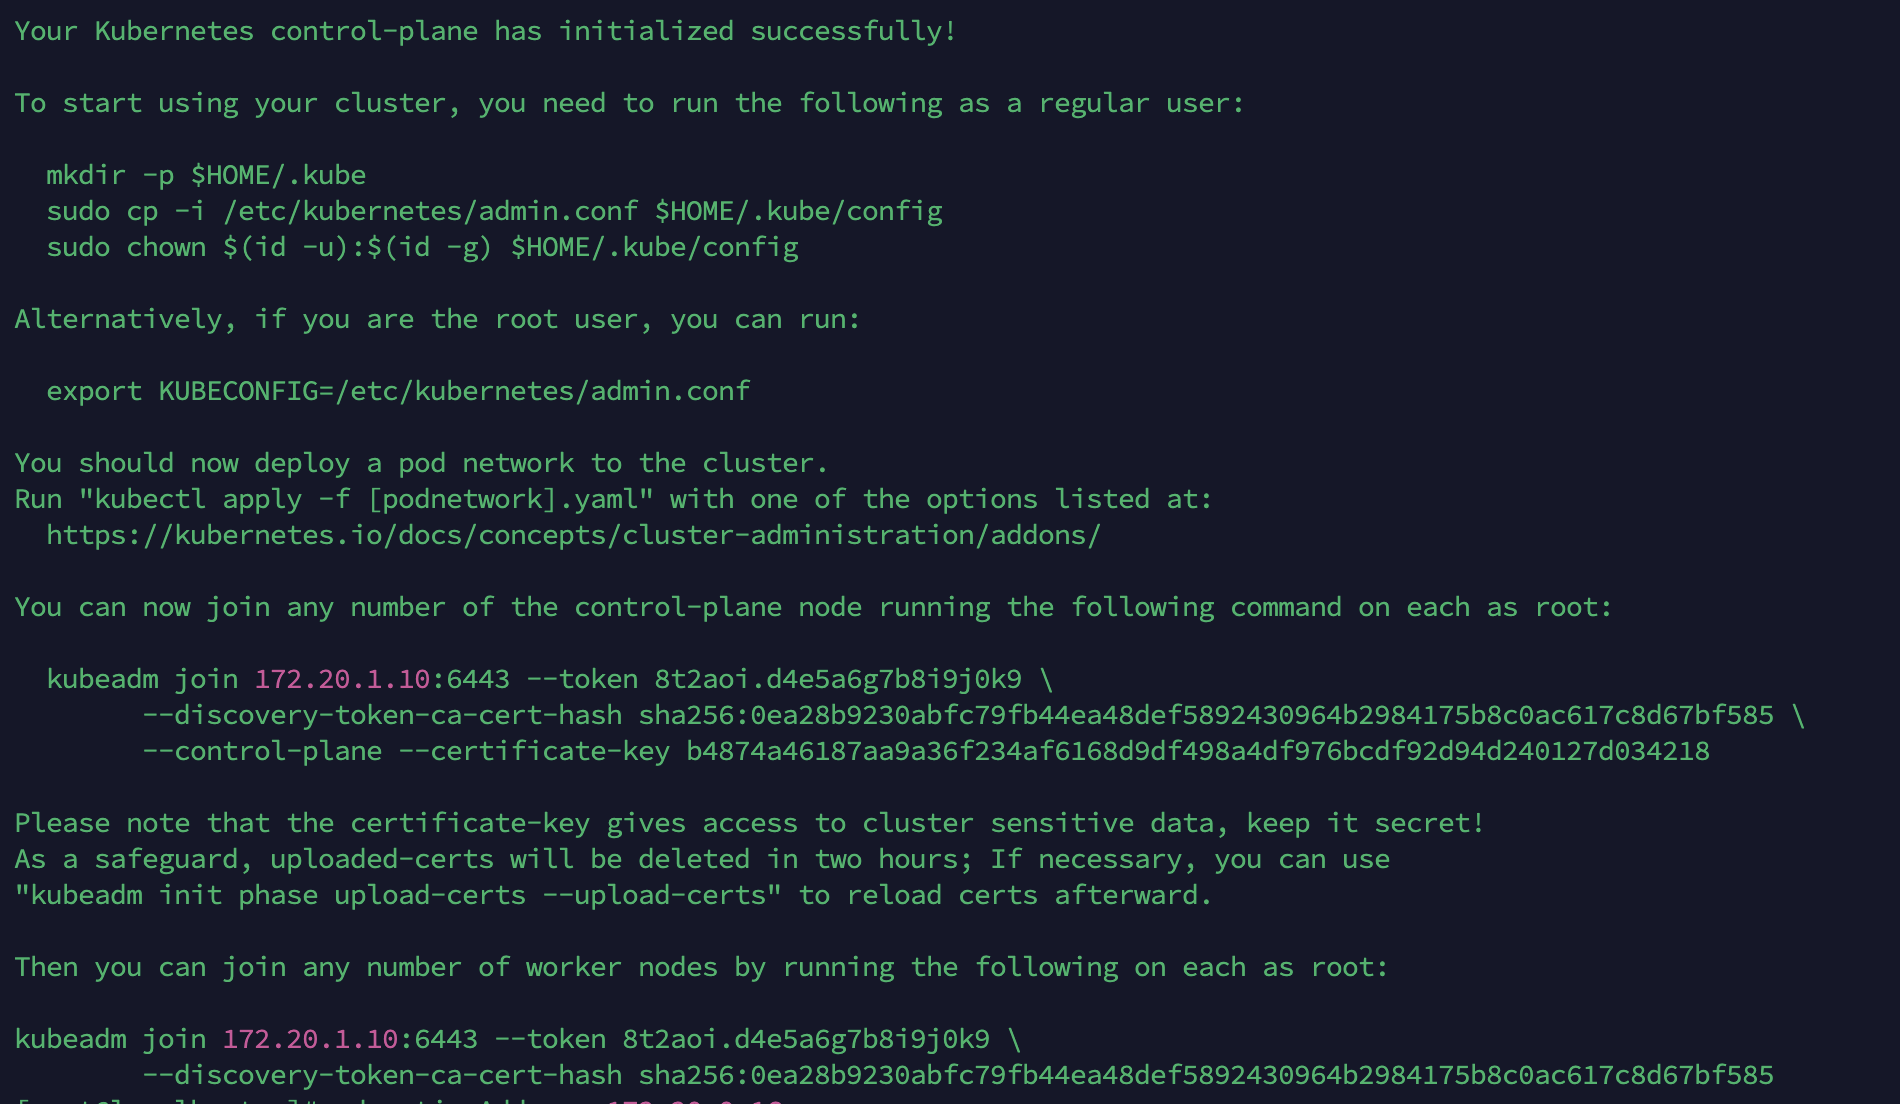
1 2 kubeadm init --config kubeadm-config.yaml --upload-certs --v=9
等待执行完成,记录加入节点命令,后面会用到
1
2
3
4
5
6
kubeadm join 172.20.1.10:6443 --token 8t2aoi.d4e5a6g7b8i9j0k9 \ --discovery-token-ca-cert-hash sha256:0ea28b9230abfc79fb44ea48def5892430964b2984175b8c0ac617c8d67bf585 \ --control-plane --certificate-key b4874a46187aa9a36f234af6168d9df498a4df976bcdf92d94d240127d034218 kubeadm join 172.20.1.10:6443 --token 8t2aoi.d4e5a6g7b8i9j0k9 \ --discovery-token-ca-cert-hash sha256:0ea28b9230abfc79fb44ea48def5892430964b2984175b8c0ac617c8d67bf585
查看当前节点状态
1 2 3 4 5 6 mkdir -p $HOME /.kube sudo cp -i /etc/kubernetes/admin.conf $HOME /.kube/config sudo chown $(id -u):$(id -g) $HOME /.kube/config kubectl get nodes
NotReady是因为没有安装网络插件
其它主节点执行
1
2
3
4
nodeName=172.20.0.18 kubeadm join 172.20.1.10:6443 --node-name $nodeName --token 8t2aoi.d4e5a6g7b8i9j0k9 \ --discovery-token-ca-cert-hash sha256:0ea28b9230abfc79fb44ea48def5892430964b2984175b8c0ac617c8d67bf585 \ --control-plane --certificate-key b4874a46187aa9a36f234af6168d9df498a4df976bcdf92d94d240127d034218
其它工作节点执行
1
2
3
nodeName=172.20.0.31 kubeadm join 172.20.1.10:6443 --node-name $nodeName --token 8t2aoi.d4e5a6g7b8i9j0k9 \ --discovery-token-ca-cert-hash sha256:0ea28b9230abfc79fb44ea48def5892430964b2984175b8c0ac617c8d67bf585
重置节点
1
2
3
4
5
6
7
8
9
iptables -F && iptables -t nat -F && iptables -t mangle -F && iptables -X ipvsadm --clear systemctl stop kubelet systemctl stop containerd rm -rf /var/lib/cni/* rm -rf /var/lib/kubelet/* rm -rf /etc/cni/* rm -rf $HOME /.kube/config systemctl start containerd
任意一个节点执行就行
https://docs.tigera.io/calico/latest/getting-started/kubernetes/quickstart
1
2
3
4
5
6
7
8
kubectl create -f https://raw.githubusercontent.com/projectcalico/calico/v3.29.2/manifests/tigera-operator.yaml kubectl get pods -n tigera-operator wget https://raw.githubusercontent.com/projectcalico/calico/v3.29.2/manifests/custom-resources.yaml sed -i 's/cidr: 192.168.0.0\/16/cidr: 10.244.0.0\/16/' custom-resources.yaml kubectl create -f custom-resources.yaml kubectl get pod -n calico-system yum install -y bind-utils && dig -t a www.baidu.com @10.96.0.10
https://kubesphere.io/zh/docs/v3.4/installing-on-kubernetes/introduction/prerequisites/
https://kubesphere.io/zh/docs/v3.4/installing-on-kubernetes/introduction/overview/
1 2 3 4 5 6 7 8 9 10 11 12 13 14 15 16 17 18 19 20 21 22 23 24 25 26 27 28 29 cat <<EOF | tee ./default-storage-class.yaml apiVersion: storage.k8s.io/v1 kind: StorageClass metadata: annotations: storageclass.kubernetes.io/is-default-class: "true" name: default-storage provisioner: kubernetes.io/no-provisioner volumeBindingMode: WaitForFirstConsumer EOF kubectl apply -f default-storage-class.yaml kubectl apply -f https://github.com/kubesphere/ks-installer/releases/download/v3.4.1/kubesphere-installer.yaml wget https://github.com/kubesphere/ks-installer/releases/download/v3.4.1/cluster-configuration.yaml endpointIps=172.20.0.16,172.20.0.17,172.20.0.18 sed -i "s/endpointIps: localhost/endpointIps: $endpointIps /" cluster-configuration.yaml sed -i 's/# adminPassword: ""/adminPassword: ""/' cluster-configuration.yaml kubectl apply -f cluster-configuration.yaml kubectl logs -n kubesphere-system $(kubectl get pod -n kubesphere-system -l 'app in (ks-controller-manager, ks-apiserver, redis)' -o jsonpath='{.items[0].metadata.name}' ) -f
报错
1
2
3
4
5
6
7
8
TASK [preinstall : KubeSphere | Stopping if default StorageClass was not found] *** fatal: [localhost]: FAILED! => { "assertion" : "\"(default)\" in default_storage_class_check.stdout" , "changed" : false , "evaluated_to" : false , "msg" : "Default StorageClass was not found !" }
1 2 3 4 5 6 7 8 9 10 11 12 13 14 kubectl get deploy -n kubesphere-system kubectl delete deploy ks-installer -n kubesphere-system kubectl describe node 172.20.0.16 | grep Taint kubectl taint nodes 172.20.0.16 node-role.kubernetes.io/master:NoSchedule- - {name: 172.20.0.16, address: 172.20.0.16, internalAddress: 172.20.0.16, user: root, password: "Yuencode@888" } - {name: 172.20.0.17, address: 172.20.0.17, internalAddress: 172.20.0.17, user: root, password: "Yuencode@888" } - {name: 172.20.0.18, address: 172.20.0.18, internalAddress: 172.20.0.18, user: root, password: "Yuencode@888" } - {name: 172.20.0.30, address: 172.20.0.30, internalAddress: 172.20.0.30, user: root, password: "Yuencode@888" } - {name: 172.20.0.31, address: 172.20.0.31, internalAddress: 172.20.0.31, user: root, password: "Yuencode@888" } kubectl logs -n kubesphere-system $(kubectl get pod -n kubesphere-system -l 'app in (ks-install, ks-installer)' -o jsonpath='{.items[0].metadata.name}' ) -f
https://kubesphere.io/zh/docs/v3.4/installing-on-linux/high-availability-configurations/internal-ha-configuration/
https://github.com/kubesphere/kubekey/blob/master/README_zh-CN.md