https://square.github.io/okhttp/
有Square公司贡献的一个处理网络请求的开源项目,是目前Android使用最广泛的网络框架。从Android 4.4开始HttpURLConnection的底层实现采用的是OkHttp。
支持HTTP/2并允许对同一主机的所有请求共享一个套接字。
如果非HTTP/2,则通过连接池减少了请求延迟。
默认请求GZip压缩数据。
响应缓存,避免了重复请求的网络。
… …
android导入依赖(build.gradle):
1 implementation("com.squareup.okhttp3:okhttp:4.9.0" )
测试URL:https://www.httpbin.org/
android添加网络权限(AndroidManifest.xml):
1 <uses-permission android:name ="android.permission.INTERNET" />
OkHttp同步异步请求
同步方式
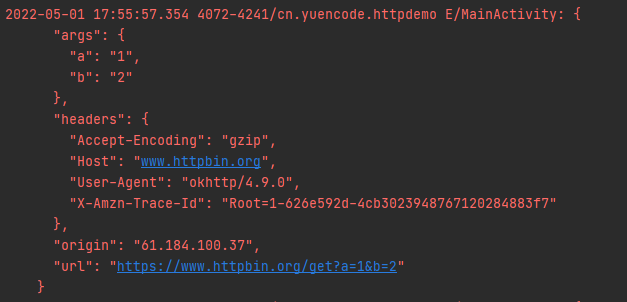
1 2 3 4 5 6 7 8 9 10 11 12 13 14 15 16 17 18 19 20 21 22 23 private void getSync () new Thread(new Runnable() { @Override public void run () OkHttpClient client = new OkHttpClient(); Request request = new Request.Builder().url("https://www.httpbin.org/get?a=1&b=2" ).build(); Call call = client.newCall(request); try { Response response = call.execute(); Log.e("MainActivity" , response.body().string()); } catch (IOException e) { e.printStackTrace(); } } }).start(); }
异步方法:
1 2 3 4 5 6 7 8 9 10 11 12 13 14 15 16 17 18 19 20 21 22 23 24 25 26 27 28 29 30 31 32 33 34 private void getAsync () OkHttpClient client = new OkHttpClient(); Request request = new Request.Builder().url("https://www.httpbin.org/get?a=1&b=2" ).build(); Call call = client.newCall(request); call.enqueue(new Callback() { @Override public void onFailure (@NonNull Call call, @NonNull IOException e) } @Override public void onResponse (@NonNull Call call, @NonNull Response response) throws IOException if (response.isSuccessful()){ Log.e("MainActivity" , response.body().string()); } } }); }
运行结果:
同步方式:
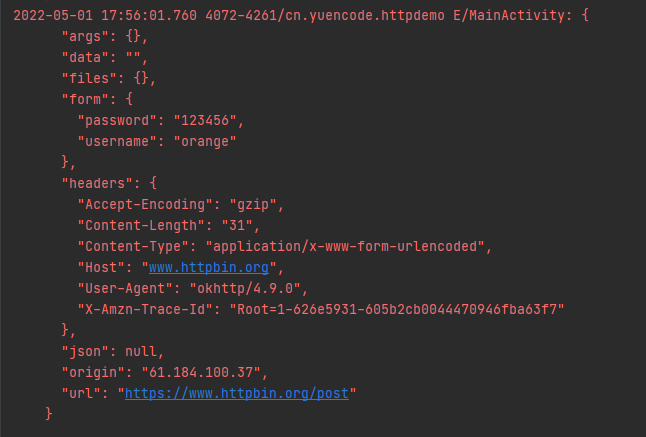
1 2 3 4 5 6 7 8 9 10 11 12 13 14 15 16 17 18 19 20 21 22 23 24 25 26 27 28 29 private void postSync () new Thread(new Runnable() { @Override public void run () OkHttpClient client = new OkHttpClient(); FormBody formBody = new FormBody.Builder() .add("username" ,"orange" ) .add("password" ,"123456" ) .build(); Request request = new Request.Builder() .url("https://www.httpbin.org/post" ) .post(formBody) .build(); Call call = client.newCall(request); try { Response response = call.execute(); Log.e("MainActivity" , response.body().string()); } catch (IOException e) { e.printStackTrace(); } } }).start(); }
异步方式:
1 2 3 4 5 6 7 8 9 10 11 12 13 14 15 16 17 18 19 20 21 22 23 24 25 26 27 28 29 30 private void postAsync () OkHttpClient client = new OkHttpClient(); FormBody formBody = new FormBody.Builder() .add("username" ,"orange" ) .add("password" ,"123456" ) .build(); Request request = new Request.Builder() .url("https://www.httpbin.org/post" ) .post(formBody) .build(); Call call = client.newCall(request); call.enqueue(new Callback() { @Override public void onFailure (@NonNull Call call, @NonNull IOException e) } @Override public void onResponse (@NonNull Call call, @NonNull Response response) throws IOException if (response.isSuccessful()){ Log.e("MainActivity" , response.body().string()); } } }); }
运行结果:
协议规定POST提交的数据必须放在请求体中,但协议并没有规定数据必须使用什么编码方式。而常用的编码方式有:
菜鸟教程 https://www.runoob.com/http/http-content-type.html
常见的媒体格式类型如下:
text/html : HTML格式
text/plain :纯文本格式
text/xml : XML格式
image/gif :gif图片格式
image/jpeg :jpg图片格式
image/png:png图片格式
以application开头的媒体格式类型:
application/x-www-form-urlencoded :
multipart/form-data : 需要在表单中进行文件上传时,就需要使用该格式
application/octet-stream : 二进制流数据(如常见的文件下载)
application/json: JSON数据格式
… …
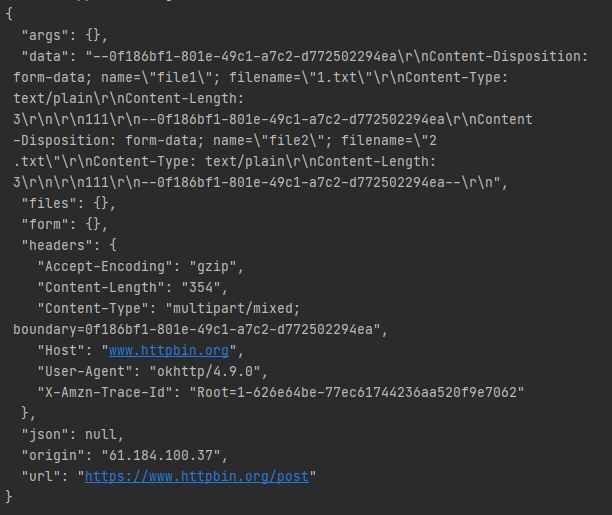
1
2
3
4
5
6
7
8
9
10
11
12
13
14
15
16
17
18
19
20
21
22
23
24
25
26
@Test public void uploadFileTest () OkHttpClient okHttpClient = new OkHttpClient(); File file1 = new File("1.txt" ); File file2 = new File("2.txt" ); MultipartBody multipartBody = new MultipartBody.Builder() .addFormDataPart("file1" ,file1.getName(), RequestBody.create(file1, MediaType.parse("text/plain" ))) .addFormDataPart("file2" ,file2.getName(),RequestBody.create(file1, MediaType.parse("text/plain" ))) .build(); Request request = new Request.Builder() .url("https://www.httpbin.org/post" ) .post(multipartBody) .build(); Call call = okHttpClient.newCall(request); try { Response response = call.execute(); System.out.println(response.body().string()); } catch (IOException e) { e.printStackTrace(); } }
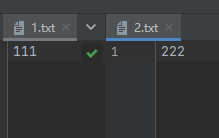
txt文件内容:
运行结果:
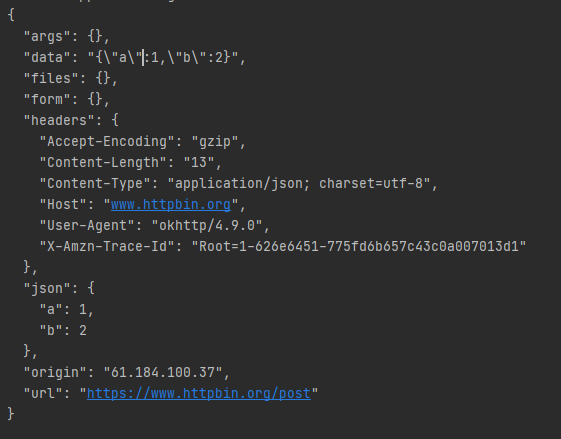
案例2:上传JSON数据
1
2
3
4
5
6
7
8
9
10
11
12
13
14
15
16
17
18
19
@Test public void uploadJsonTest () OkHttpClient okHttpClient = new OkHttpClient(); RequestBody requestBody = RequestBody.create("{\"a\":1,\"b\":2}" , MediaType.parse("application/json" )); Request request = new Request.Builder() .url("https://www.httpbin.org/post" ) .post(requestBody) .build(); Call call = okHttpClient.newCall(request); try { Response response = call.execute(); System.out.println(response.body().string()); } catch (IOException e) { e.printStackTrace(); } }
运行结果:
OkHttp给我们提供了一种构建者的模式来创建OkHttpClient对象。
1 OkHttpClient okHttpClient = new OkHttpClient.Builder().build();
1
2
OkHttpClient okHttpClient = new OkHttpClient.Builder().addInterceptor(匿名内部类).build(); OkHttpClient okHttpClient = new OkHttpClient.Builder().addNetworkInterceptor(匿名内部类).build();
基本使用:
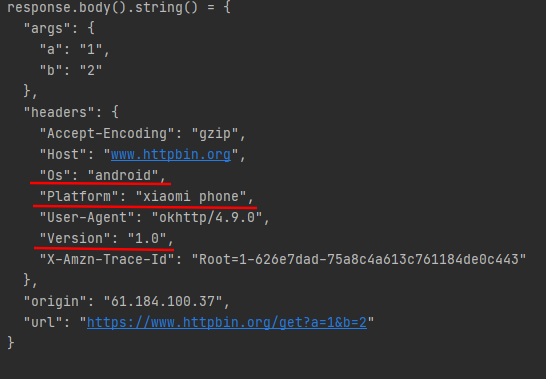
1
2
3
4
5
6
7
8
9
10
11
12
13
14
15
16
17
18
19
20
21
22
23
24
25
26
27
28
29
30
31
32
33
34
35
36
37
38
39
@Test public void interceptorTest () OkHttpClient okHttpClient = new OkHttpClient.Builder().addInterceptor(new Interceptor() { @NonNull @Override public Response intercept (@NonNull Chain chain) throws IOException Request request = chain.request().newBuilder() .addHeader("os" ,"android" ) .addHeader("version" ,"1.0" ) .build(); Response response = chain.proceed(request); return response; } }).build(); Request request = new Request.Builder().url("https://www.httpbin.org/get?a=1&b=2" ).build(); Call call = okHttpClient.newCall(request); try { Response response = call.execute(); System.out.println("response.body().string() = " + response.body().string()); } catch (IOException e) { e.printStackTrace(); } }
运行结果:
拦截器可以添加多个:
执行顺序按照添加顺序执行
1
2
3
4
5
6
7
8
9
10
11
12
13
14
15
16
17
18
19
20
21
22
23
24
25
26
27
28
29
30
31
32
33
34
35
36
37
38
39
40
41
42
43
44
45
@Test public void muiltInterceptorTest () OkHttpClient okHttpClient = new OkHttpClient.Builder() .addInterceptor(new Interceptor() { @NonNull @Override public Response intercept (@NonNull Chain chain) throws IOException Request request = chain.request().newBuilder() .addHeader("os" , "android" ) .addHeader("version" , "1.0" ) .build(); Response response = chain.proceed(request); return response; } }) .addInterceptor(new Interceptor() { @NonNull @Override public Response intercept (@NonNull Chain chain) throws IOException Request request = chain.request().newBuilder() .addHeader("platform" , "xiaomi phone" ) .build(); Response response = chain.proceed(request); return response; } }) .addInterceptor(new Interceptor() { @NonNull @Override public Response intercept (@NonNull Chain chain) throws IOException return chain.proceed(chain.request()); } }) .build(); Request request = new Request.Builder().url("https://www.httpbin.org/get?a=1&b=2" ).build(); Call call = okHttpClient.newCall(request); try { Response response = call.execute(); System.out.println("response.body().string() = " + response.body().string()); } catch (IOException e) { e.printStackTrace(); } }
运行结果:
addInterceptor 和 addNetworkInterceptor 的区别:
Application Interceptors
使用 addInterceptor() 注册
有无网络都会被调用到
application 拦截器只会被调用一次,调用 chain.proceed() 得到的是重定向之后最终的响应信息,不会通过 chain.connection() 获得中间过程的响应信息允许 short-circuit (短路) 并且允许不去调用 chain.proceed() 请求服务器数据,可通过缓存来返回数据。
Network Interceptors
使用 addNetworkInterceptor() 注册
无网络时不会被调用
可以显示更多的信息,比如 OkHttp 为了减少数据的传输时间以及传输流量而自动添加的请求头 Accept-Encoding: gzip 希望服务器能返回经过压缩过的响应数据。
chain.connection() 返回不为空的 Connection 对象可以查询到客户端所连接的服务器的IP地址以及TLS配置信息。
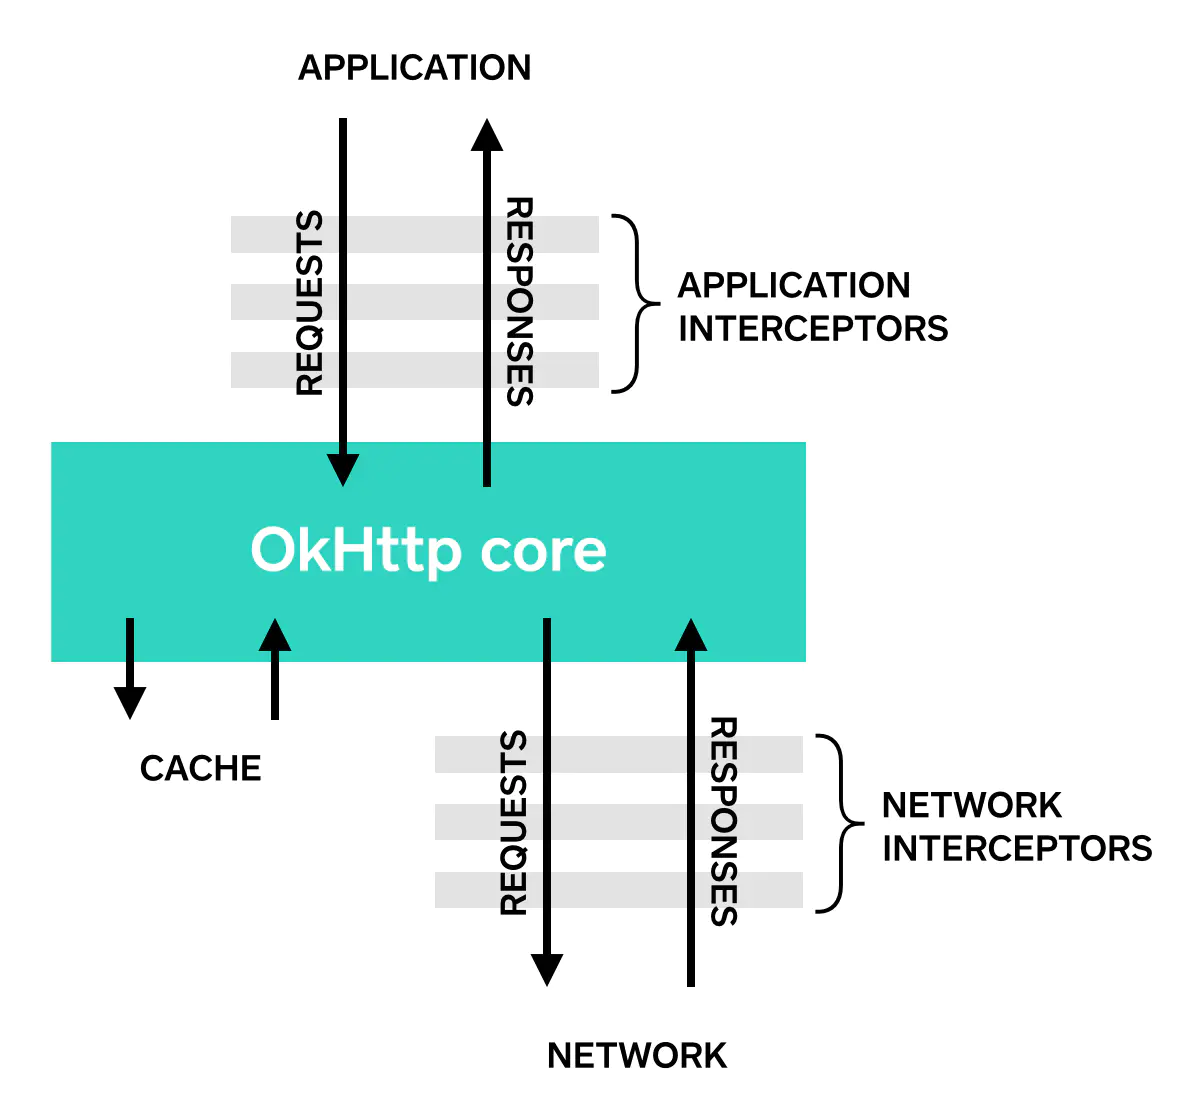
拦截器的调用的顺序:
调用顺序是先按 addInterceptor() 设置的顺序遍历,再按 addNetworkInterceptor() 设置的顺序遍历,返回的结果则是反着来,如图:
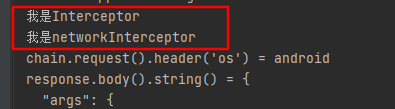
1
2
3
4
5
6
7
8
9
10
11
12
13
14
15
16
17
18
19
20
21
22
23
24
25
26
27
28
29
30
31
32
33
34
35
36
37
38
39
@Test public void networkInterceptorTest () OkHttpClient okHttpClient = new OkHttpClient.Builder() .addNetworkInterceptor(new Interceptor() { @NonNull @Override public Response intercept (@NonNull Chain chain) throws IOException System.out.println("我是networkInterceptor" ); System.out.println("chain.request().header('os') = " + chain.request().header("os" )); return chain.proceed(chain.request()); } }) .addInterceptor(new Interceptor() { @NonNull @Override public Response intercept (@NonNull Chain chain) throws IOException System.out.println("我是Interceptor" ); Request request = chain.request().newBuilder() .addHeader("os" , "android" ) .addHeader("version" , "1.0" ) .build(); Response response = chain.proceed(request); return response; } }) .build(); Request request = new Request.Builder().url("https://www.httpbin.org/get?a=1&b=2" ).build(); Call call = okHttpClient.newCall(request); try { Response response = call.execute(); System.out.println("response.body().string() = " + response.body().string()); } catch (IOException e) { e.printStackTrace(); } }
运行结果:
参考文章:OkHttp Interceptor 入门到进阶
OkHttp按照http协议规则实现了缓存的处理。缓存是比如:当我们发起第一次请求之后,如果后续还需要进行同样的请求,此时若果符合缓存规则,则可以减少与服务器的网络通信,直接从本地文件缓存中读取响应返回给请求者。但是默认区情况下,OkHttp的缓存是关闭状态,需要我们开启。
类似浏览器访问页面,浏览器在访问页面时候也会缓存。
1
2
3
4
5
6
7
8
9
10
11
12
13
14
15
16
17
18
19
20
21
public class OkHttpCacheTest @Test public void cacheTest () OkHttpClient okHttpClient = new OkHttpClient.Builder() .cache(new Cache(new File("cache.txt" ),1024 *1024 )) .build(); Request request = new Request.Builder().url("http://www.httpbin.org/get" ).get().build(); Call call = okHttpClient.newCall(request); try { Response response = call.execute(); System.out.println("response.body().string() = " + response.body().string()); } catch (IOException e) { e.printStackTrace(); } } }
Cookie是某些网站为了辨别用户身份,进行会话跟踪(比如确定登录状态),而存储在用于本地终端上的数据(通常经过加密),由用户客户端计算机暂时或永久保存的信息。
与浏览器访问网页相似:
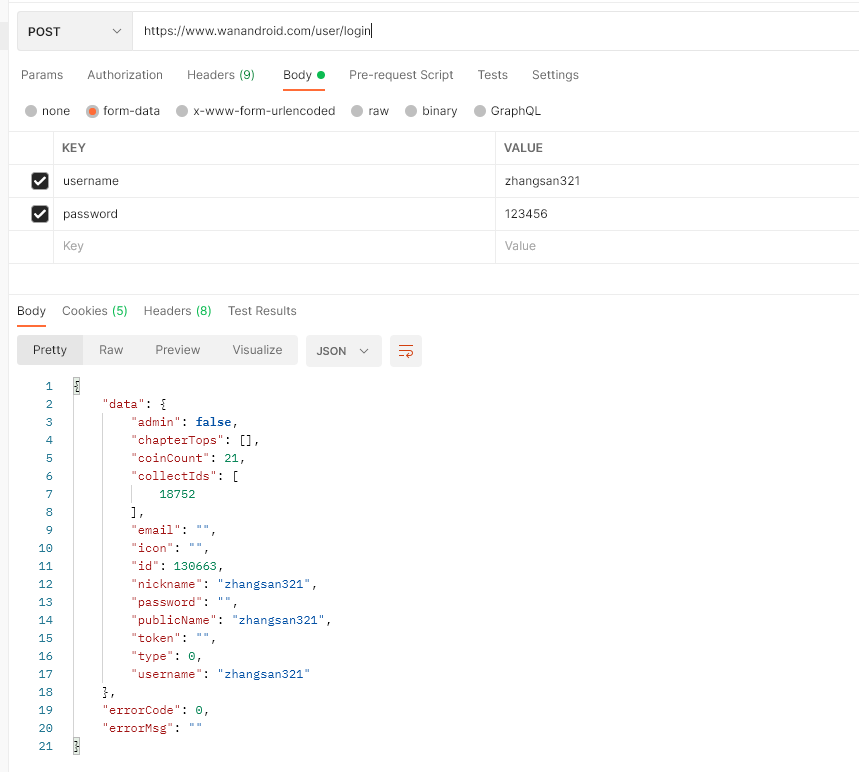
使用接口:玩安卓 https://www.wanandroid.com
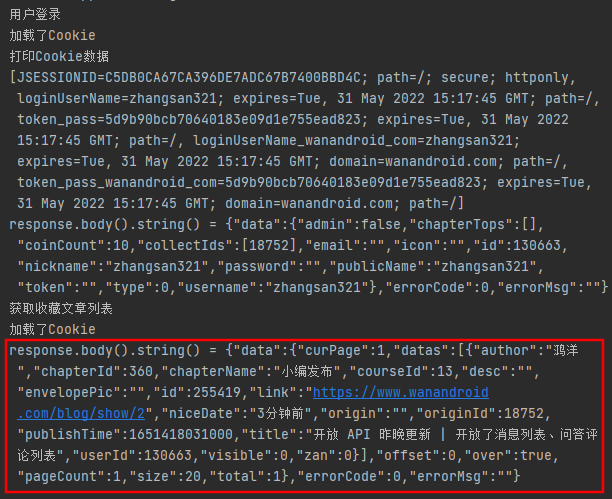
1
2
3
4
5
6
7
8
9
10
11
12
13
14
15
16
17
18
19
20
21
22
23
24
25
26
27
28
29
30
31
32
33
34
35
36
37
38
39
40
41
42
43
44
45
46
47
48
49
50
51
52
53
54
55
56
57
58
59
60
61
62
63
64
65
public class OkHttpCookieTest List<Cookie> cookies = new ArrayList<>(); @Test public void cookieTset () OkHttpClient okHttpClient = new OkHttpClient.Builder() .cookieJar(new CookieJar() { @Override public void saveFromResponse (@NonNull HttpUrl httpUrl, @NonNull List<Cookie> list) cookies = list; System.out.println("打印Cookie数据" ); System.out.println(cookies.toString()); } @NonNull @Override public List<Cookie> loadForRequest (@NonNull HttpUrl httpUrl) System.out.println("加载了Cookie" ); return cookies; } }) .build(); System.out.println("用户登录" ); FormBody formBody = new FormBody.Builder() .add("username" , "zhangsan321" ) .add("password" , "123456" ) .build(); Request request = new Request.Builder().url("https://www.wanandroid.com/user/login" ) .post(formBody) .build(); Call call = okHttpClient.newCall(request); try { Response response = call.execute(); System.out.println("response.body().string() = " + response.body().string()); } catch (IOException e) { e.printStackTrace(); } System.out.println("获取收藏文章列表" ); request = new Request.Builder() .url("https://www.wanandroid.com/lg/collect/list/0/json" ) .get().build(); call = okHttpClient.newCall(request); try { Response response = call.execute(); System.out.println("response.body().string() = " + response.body().string()); } catch (IOException e) { e.printStackTrace(); } } }
运行结果:
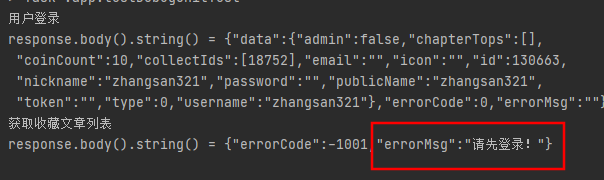
去掉Cookie的配置:
获取收藏文章列表时,提示请先登录。
OkHttp官网 https://square.github.io/okhttp/
A type-safe HTTP client for Android and Java.封装了OkHttp,也是有Square公司贡献的一个处理网络请求的开源项目。
https://github.com/square/Retrofit
android导入依赖(build.gradle):
1 com.squareup.retrofit2:retrofit:2.9 .0
在retrofit中封装了OkHttp,即导入上面的包,也就是也导入了OkHttp的包implementation("com.squareup.okhttp3:okhttp:4.9.0")。OkHttp的相关类同样可以使用。
开启网络权限:
1 <uses-permission android:name ="android.permission.INTERNET" />
可以在不同域名使用不用的接口,在这个域名调用这个接口,在另一个域名调用另一个接口或相同的接口。
创建HTTP接口
1
2
3
4
5
6
7
8
9
10
11
12
13
14
15
16
17
18
19
20
21
22
23
24
25
26
27
28
29
30
31
32
33
34
35
36
37
38
39
package cn.yuencode.retrofit_app.http;import okhttp3.ResponseBody;import retrofit2.Call;import retrofit2.http.Field;import retrofit2.http.FormUrlEncoded;import retrofit2.http.GET;import retrofit2.http.POST;import retrofit2.http.Query;public interface HttpbinService @POST("post") @FormUrlEncoded Call<ResponseBody> postRequest (@Field("username") String username, @Field("password") String password) ; @GET("get") Call<ResponseBody> getRequest (@Query("username") String username, @Query("password") String password) ; }
注意:ResponseBody为OkHttp包中的。
发送请求
get同步请求:
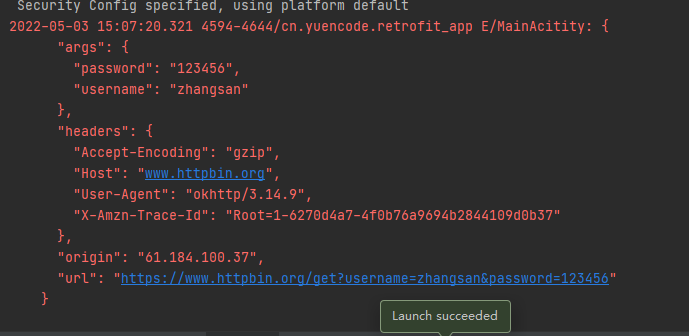
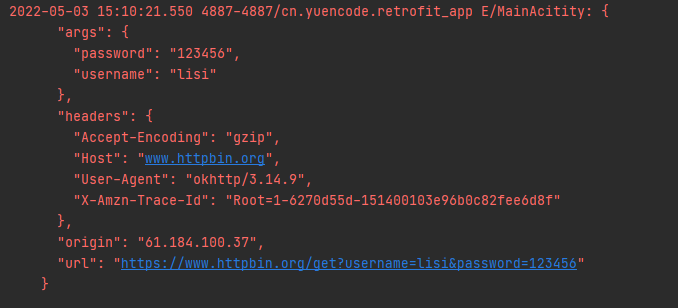
1 2 3 4 5 6 7 8 9 10 11 12 13 14 15 16 17 18 19 20 21 22 23 private void getSync () new Thread(new Runnable() { @Override public void run () Retrofit retrofit = new Retrofit.Builder().baseUrl("https://www.httpbin.org/" ).build(); HttpbinService httpbinService = retrofit.create(HttpbinService.class); Call<ResponseBody> call = httpbinService.getRequest("zhangsan" , "123456" ); try { Response<ResponseBody> response = call.execute(); Log.e("MainAcitity" ,response.body().string()); } catch (IOException e) { e.printStackTrace(); } } }).start(); }
运行结果:
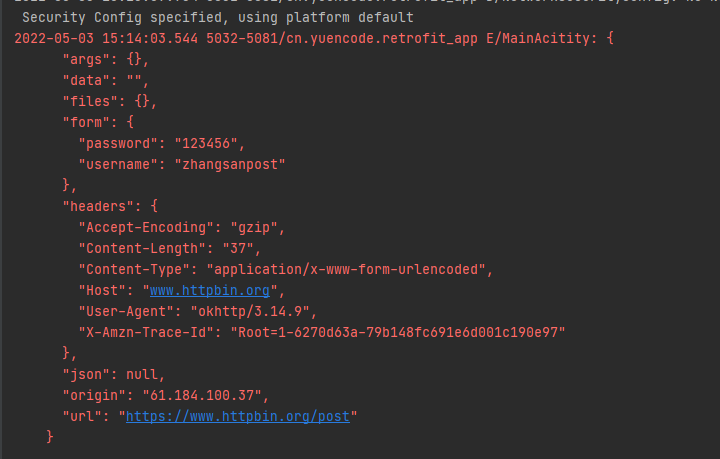
1 2 3 4 5 6 7 8 9 10 11 12 13 14 15 16 17 18 19 20 21 22 private void postSync () new Thread(new Runnable() { @Override public void run () Retrofit retrofit = new Retrofit.Builder().baseUrl("https://www.httpbin.org/" ).build(); HttpbinService httpbinService = retrofit.create(HttpbinService.class); Call<ResponseBody> call = httpbinService.postRequest("zhangsanpost" , "123456" ); try { Response<ResponseBody> response = call.execute(); Log.e("MainAcitity" ,response.body().string()); } catch (IOException e) { e.printStackTrace(); } } }).start(); }
运行结果:
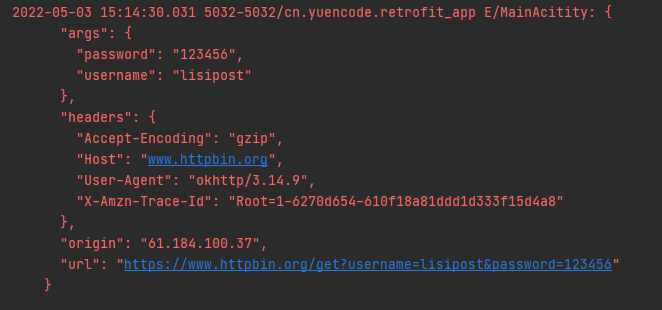
1 2 3 4 5 6 7 8 9 10 11 12 13 14 15 16 17 18 19 20 21 22 23 24 25 26 private void postAsync () Retrofit retrofit = new Retrofit.Builder().baseUrl("https://www.httpbin.org/" ).build(); HttpbinService httpbinService = retrofit.create(HttpbinService.class); Call<ResponseBody> call = httpbinService.getRequest("lisipost" , "123456" ); call.enqueue(new Callback<ResponseBody>() { @Override public void onResponse (Call<ResponseBody> call, Response<ResponseBody> response) try { Log.e("MainAcitity" ,response.body().string()); } catch (IOException e) { e.printStackTrace(); } } @Override public void onFailure (Call<ResponseBody> call, Throwable t) } }); }
运行结果:
类型
注解
方法注解
@GET、@POST、@PUT、@DELETE、@PATH、@HEAD、@OPTIONS、@HTTP
标记注解
@FormUrlEncoded、@Multipart、@Streaming
参数注解
@Query、@QueryMap、@Body、@Field、@FieldMap、@Part、@PartMap
其他注解
@Path、@Header、@Headers、@Url
@HTTP:提供指定请求方法与请求路径的方式。
1 2 3 4 5 6 7 8 9 10 11 12 13 14 15 16 17 18 19 20 21 22 23 24 25 26 27 28 29 30 31 32 33 34 35 36 37 38 39 40 41 42 43 44 45 46 47 48 49 50 51 52 public class RetrofitHttpAnnoTest @Test public void HttpAnnoGetTest () Retrofit retrofit = new Retrofit.Builder().baseUrl("https://www.httpbin.org" ).build(); TestService testService = retrofit.create(TestService.class); Call<ResponseBody> call = testService.getRequest("android" ); try { Response<ResponseBody> execute = call.execute(); System.out.println("execute.body().string() = " + execute.body().string()); } catch (IOException e) { e.printStackTrace(); } } @Test public void HttpAnnoPostTest () Retrofit retrofit = new Retrofit.Builder().baseUrl("https://www.httpbin.org" ).build(); TestService testService = retrofit.create(TestService.class); Call<ResponseBody> call = testService.postRequest("zhangsan" ,"123456" ); try { Response<ResponseBody> execute = call.execute(); System.out.println("execute.body().string() = " + execute.body().string()); } catch (IOException e) { e.printStackTrace(); } } } interface TestService @HTTP(method = "GET", path = "get") Call<ResponseBody> getRequest (@Query("title") String title) ; @HTTP(method = "POST", path = "post",hasBody = true) @FormUrlEncoded Call<ResponseBody> postRequest (@Field("username") String username, @Field("password") String password) ; }
@Multipart、@Streaming 文件下载上传中使用。
@QueryMap、@FieldMap、@PartMap注解,通过键值对的方式定义参数,对于参数数据多的情况使用此方式,会更加地美观。
1 2 3 4 5 6 7 8 9 10 11 12 13 14 15 16 17 18 19 20 21 22 23 24 25 26 27 28 29 30 31 32 33 34 35 36 37 38 39 40 41 42 43 44 45 46 47 48 49 50 51 52 53 54 55 56 57 58 59 60 61 62 63 64 public class RetrofitParamAnnoTest Retrofit retrofit = null ; ParamAnnoService paramAnnoService = null ; @Before public void before () retrofit = new Retrofit.Builder().baseUrl("https://www.httpbin.org" ).build(); paramAnnoService = retrofit.create(ParamAnnoService.class); } @Test public void queryMapTest () Map<String, String> map = new HashMap<>(); map.put("title" , "android" ); map.put("page" , "1" ); map.put("size" , "10" ); Call<ResponseBody> call = paramAnnoService.get(map); try { Response<ResponseBody> execute = call.execute(); System.out.println("execute.body().string() = " + execute.body().string()); } catch (IOException e) { e.printStackTrace(); } } @Test public void fieldMapTest () Map<String, String> map = new HashMap<>(); map.put("title" , "android" ); map.put("page" , "1" ); map.put("size" , "10" ); Call<ResponseBody> call = paramAnnoService.post(map); try { Response<ResponseBody> execute = call.execute(); System.out.println("execute.body().string() = " + execute.body().string()); } catch (IOException e) { e.printStackTrace(); } } } interface ParamAnnoService @GET("get") Call<ResponseBody> get (@QueryMap Map<String, String> mapData) ; @POST("post") @FormUrlEncoded Call<ResponseBody> post (@FieldMap Map<String, String> mapData) ; }
@Body
post(@Body RequestBody body);自定义body参数,OkHttp中的body。自己指定不用使用@FormUrlEncoded注解。
而通过注解@Field等的方式,相当于就是帮我们最后生成了RequestBody
1
2
3
4
5
6
7
8
9
10
11
12
13
14
15
16
17
18
19
20
21
22
23
24
25
ParamAnnoService.java @POST("post") Call<ResponseBody> bodyPostTest (@Body RequestBody body) ;RetrofitParamAnnoTest.java @Test public void BodyTest () FormBody formBody = new FormBody.Builder() .add("username" ,"zhangsan" ) .add("password" ,"123456" ) .build(); Call<ResponseBody> call = paramAnnoService.bodyPostTest(formBody); try { Response<ResponseBody> execute = call.execute(); System.out.println("execute.body().string() = " + execute.body().string()); } catch (IOException e) { e.printStackTrace(); } }
@Path:作用于参数,动态指定url请求地址
1 2 3 4 5 @GET("/lg/collect/list/{page_size}/json") Call<ResponseBody> collectList (@Path("page_size") String page) ;
@Header注解。设置请求头
post(@Header(“os”) String os)
可设置多个。
1
2
@GET("/get") Call<ResponseBody> getTestHeader (@Header("os") String osName,@Header("version") String version) ;
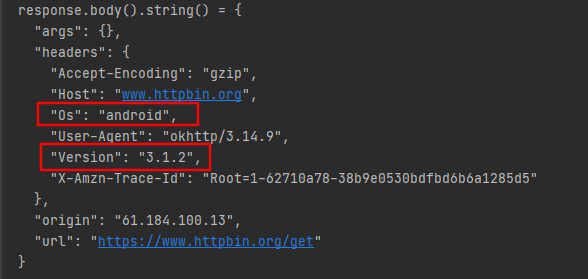
1
2
3
4
5
6
7
8
9
10
@Test public void setHeaderTest () Call<ResponseBody> call = otherAnnoService.getTestHeader("android" , "3.1.2" ); try { Response<ResponseBody> response = call.execute(); System.out.println("response.body().string() = " + response.body().string()); } catch (IOException e) { e.printStackTrace(); } }
运行结果:
@Headers注解:设置多个请求头,定义在方法上面
1
2
3
4
5
6
@GET("get") @Headers({ "os:android", "version:4.0.1", }) Call<ResponseBody> getTestHeaders () ;
1
2
3
4
5
6
7
8
9
10
@Test public void setHeadersTest () Call<ResponseBody> call = otherAnnoService.getTestHeaders(); try { Response<ResponseBody> response = call.execute(); System.out.println("response.body().string() = " + response.body().string()); } catch (IOException e) { e.printStackTrace(); } }
运行结果:
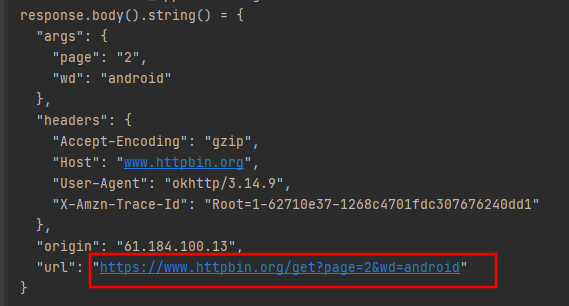
@Url注解,作用于参数,动态设置请求路径,指定一个本次请求完整的url。
1 2 3 4 5 6 @GET Call<ResponseBody> getTestUrl (@Url String url, @Query("wd") String key) ;
1
2
3
4
5
6
7
8
9
10
@Test public void urlTest () Call<ResponseBody> call = otherAnnoService.getTestUrl("https://www.httpbin.org/get?page=2" ,"android" ); try { Response<ResponseBody> response = call.execute(); System.out.println("response.body().string() = " + response.body().string()); } catch (IOException e) { e.printStackTrace(); } }
注意:当使用@Url注解时,请求方法类型注解不能带请求路径。
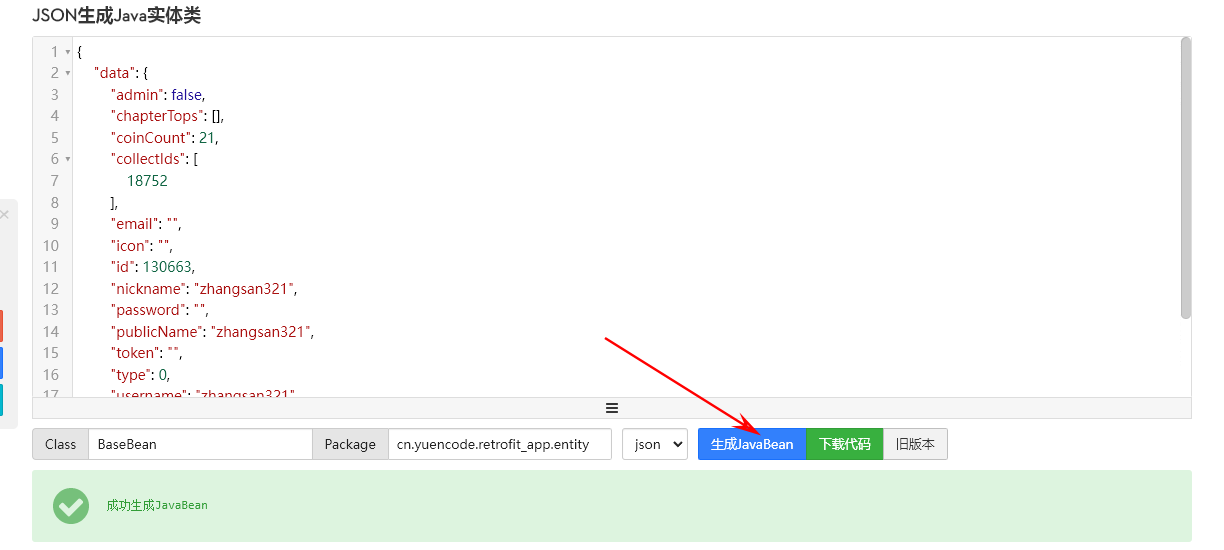
在我们收到服务器的响应后,目前无论是OkHttp还是Retrofit都只能接受到String字符串类型的数据,在实际开发中,我们经常需要对字符串进行解析将其转变成一个Java Bean对象。
比如,服务器响应的数据为JSON格式字符串,那我们可以自己利用GSON库完成反序列化的操作。而Retrofit提供了多个转换器使得响应能够完成自动的数据转换。
此依赖内包含了Gson依赖。
1 implementation("com.squareup.retrofit2:converter-gson:2.9.0" )
返回值泛型可不在书写为ResponseBody,可直接改为对应的JavaBean。
1
2
3
@POST("post") @FormUrlEncoded Call<JavaBean> post (@Field("username") String username, @Field("password") String passwrod) ;
接口: 玩安卓 https://www.wanandroid.com/
手动创建JavaBean比较麻烦,可使用工具。
工具:JSON数据转JavaBean ,https://www.bejson.com/json2javapojo/new/
将返回的JSON粘贴至网页。
1 .addConverterFactory(GsonConverterFactory.create())
1
2
3
4
5
retrofit = new Retrofit.Builder() .baseUrl("https://www.wanandroid.com/" ) .addConverterFactory(GsonConverterFactory.create()) .build();
完整案例:
1
2
3
4
5
6
7
8
9
10
11
12
13
14
15
16
17
18
19
20
21
22
23
24
25
26
27
28
29
30
31
32
33
34
35
36
37
38
39
40
41
42
43
44
45
46
47
48
package cn.yuencode.retrofit_app;import org.junit.Before;import org.junit.Test;import java.io.IOException;import cn.yuencode.retrofit_app.entity.BaseBean;import retrofit2.Call;import retrofit2.Response;import retrofit2.Retrofit;import retrofit2.converter.gson.GsonConverterFactory;import retrofit2.http.Field;import retrofit2.http.FormUrlEncoded;import retrofit2.http.POST;public class RetrofitConverterTest Retrofit retrofit = null ; ConverterTestService converterTestService = null ; @Before public void before () retrofit = new Retrofit.Builder() .baseUrl("https://www.wanandroid.com/" ) .addConverterFactory(GsonConverterFactory.create()) .build(); converterTestService = retrofit.create(ConverterTestService.class); } @Test public void testLogin () Call<BaseBean> call = converterTestService.login("zhangsan321" , "123456" ); Response<BaseBean> baseBeanResponse = null ; try { baseBeanResponse = call.execute(); } catch (IOException e) { e.printStackTrace(); } System.out.println("baseBeanResponse.body() = " + baseBeanResponse.body()); } } interface ConverterTestService @POST("/user/login") @FormUrlEncoded Call<BaseBean> login (@Field("username") String username, @Field("password") String password) ; }
运行结果:
先登录后才能请求收藏文章列表。
Retrofit的接口方法返回值必须是Call,如果能够将Call改为RxJava中的Observable,对于嵌套的情况,就能够得到非常方便优雅的解决。这就是适配器的功能,如果我们想要返回的不是Call,适配器就能够帮助我们转换为其他类型。
不使用嵌套请求,就需要嵌套回调,一个回调里面又有一个回调,非常麻烦不美观。
添加依赖:
1 2 3 implementation("com.squareup.retrofit2:adapter-rxjava:3.2.9.0" ) implementation("io.reactivex.rxjava3:rxandroid:3.0.0" )
添加适配器:
1 .addCallAdapterFactory(RxJava3CallAdapterFactory.create())
自定义OkHttp,添加Cookie配置
1 2 3 4 5 6 7 8 9 10 11 .callFactory(new OkHttpClient.Builder().cookieJar(new CookieJar() { @Override public void saveFromResponse (HttpUrl url, List<Cookie> cookies) } @Override public List<Cookie> loadForRequest (HttpUrl url) return null ; } }).build())
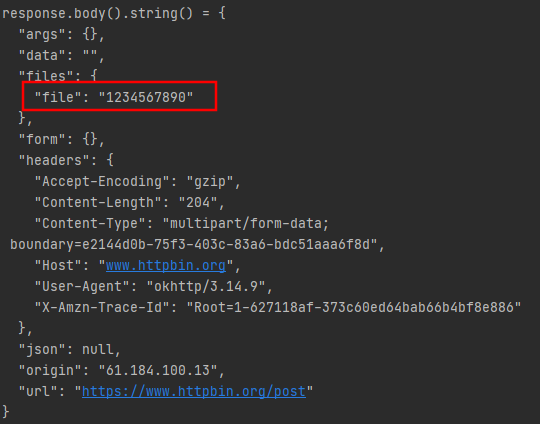
上传文件:
1.txt
1
2
3
@POST("/post") @Multipart Call<ResponseBody> uploadFile (@Part MultipartBody.Part part) ;
1
2
3
4
5
6
7
8
9
10
11
12
13
14
15
@Test public void testUploadFile () File file = new File("1.txt" ); MultipartBody.Part part = MultipartBody.Part .createFormData("file" ,"1.txt" , RequestBody.create(MediaType.parse("text/html" ), file)); Call<ResponseBody> call = fileTestService.uploadFile(part); try { Response<ResponseBody> response = call.execute(); System.out.println("response.body().string() = " + response.body().string()); } catch (IOException e) { e.printStackTrace(); } }
运行结果:
下载文件:
文件比较大可以使用@Sreaming注解,避免内存溢出。
1
2
3
@GET @Streaming Call<ResponseBody> downloadFile (@Url String url) ;
1 2 3 4 5 6 7 8 9 10 11 12 13 14 @Test public void testDownloadFile () throws IOException Call<ResponseBody> call = fileTestService.downloadFile("http://pan.yuencode.cn/externalLinksController/chain/ToDesk_Setup.exe?ckey=Ik77ZxRTGL%2BNNHo1AnerUfIG0o3mGa6Is5nGfMOFX1ebBqLQKsXnJ2Gjg8jOk8H2" ); Response<ResponseBody> response = call.execute(); File file = new File("1.exe" ); FileOutputStream fos = new FileOutputStream(file); InputStream inputStream = response.body().byteStream(); byte [] buffer = new byte [1024 *1024 ]; int len; while ((len = inputStream.read(buffer)) != -1 ){ fos.write(buffer,0 ,len); } }
运行结果:
本篇文章中完整案例代码 https://git.yuencode.cn/jiaxiaoyu/HttpDemo.git