对象的容器,定义了对多个对象进行操作的常用方法。类似数组功能。
和数组的区别:
数组长度固定,集合长度不固定
数组可以存储基本类型和引用类型,而集合只能存储引用类型。
位置:java.util.*
从上图可以看出来Collection集合位于所有集合的最顶层,是所有集合的父接口。Collection有两个子接口List和Set。
List接口特点:有序、有下标、元素可重复
Set接口特点:无序、无下标、元素不能重复
List接口下面有三个实现类,分别是ArrayList、LinkedList、Vector三个,其中Vector很老了,基本不用了;
Set接口下面有一个实现类HashSet与一个接口SortedSet,其中接口SortedSet被TreeSet实现了。
特点:代表一组任意类型的对象,无序、无下标、不能重复。
整体上看Collection接口的特点是无序、无下标、不能重复,但是api文档中描述的是:一些 collection 允许有重复的元素,而另一些则不允许。一些 collection 是有序的,而另一些则是无序的。
方法:
方法
功能
boolean add(E e);向collection中添加元素
boolean addAll(Collection<? extends E> c);将指定 collection 中的所有元素都添加到此 collection 中
void clear();移除此 collection 中的所有元素
boolean contains(Object o);判断collection中是否包含指定元素
boolean containsAll(Collection<?> c);判断collection中是否collection 包含指定 collection 中的所有元素
boolean equals(Object o);比较此 collection 与指定对象是否相等。
boolean isEmpty();判断collection是否为空
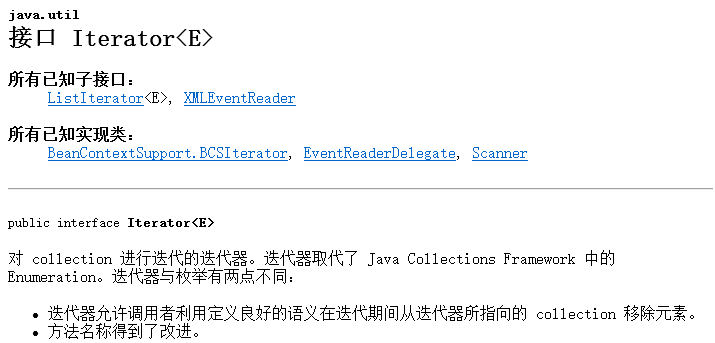
Iterator<E> iterator();返回在此 collection 的元素上进行迭代的迭代器。
boolean remove(Object o);从 collection 中移除指定元素的单个实例,如果存在的话
boolean removeAll(Collection<?> c);移除此 collection 中那些也包含在指定 collection 中的所有元素
boolean retainAll(Collection<?> c);仅保留此 collection 中那些也包含在指定 collection 的元素
int size();返回此 collection 中的元素数。
Object[] toArray();返回包含此 collection 中所有元素的数组。
<T> T[] toArray(T[] a);返回包含此 collection 中所有元素的数组;返回数组的运行时类型与指定数组的运行时类型相同。
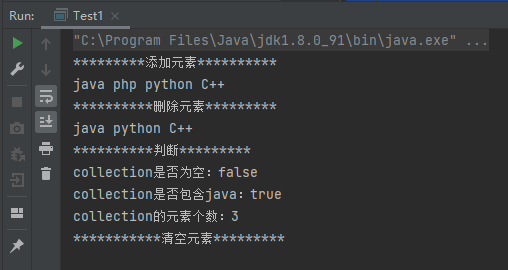
案例1:Collection的基本使用
1
2
3
4
5
6
7
8
9
10
11
12
13
14
15
16
17
18
19
20
21
22
23
24
25
26
27
28
29
30
31
32
33
34
35
36
37
38
39
40
41
42
43
44
45
46
public class Test1 public static void main (String[] args) System.out.println("*********添加元素**********" ); Collection collection = new ArrayList(); collection.add("java" ); collection.add("php" ); collection.add("python" ); collection.add("C++" ); for (Object o : collection) { System.out.print(o +" " ); } System.out.println(); System.out.println("**********删除元素*********" ); collection.remove("php" ); for (Object o : collection) { System.out.print(o +" " ); } System.out.println(); System.out.println("**********判断*********" ); boolean b1 = collection.isEmpty(); System.out.println("collection是否为空:" +b1); boolean b2 = collection.contains("java" ); System.out.println("collection是否包含java:" +b2); int length = collection.size(); System.out.println("collection的元素个数:" +length); System.out.println("***********清空元素*********" ); collection.clear(); for (Object o : collection) { System.out.print(o +" " ); } System.out.println(); } }
运行结果:
迭代器:
方法:
方法
功能
boolean hasNext();如果仍有元素可以迭代,则返回 true。
E next();返回迭代的下一个元素。
void remove();从迭代器指向的 collection 中移除迭代器返回的最后一个元素。
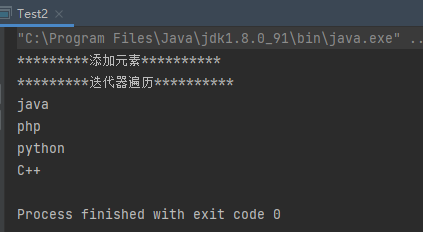
案例2:迭代器的使用(遍历)
1
2
3
4
5
6
7
8
9
10
11
12
13
14
15
16
17
public class Test2 public static void main (String[] args) System.out.println("*********添加元素**********" ); Collection collection = new ArrayList(); collection.add("java" ); collection.add("php" ); collection.add("python" ); collection.add("C++" ); System.out.println("*********迭代器遍历**********" ); Iterator iterator = collection.iterator(); while (iterator.hasNext()){ System.out.println(iterator.next()); } } }
运行结果:
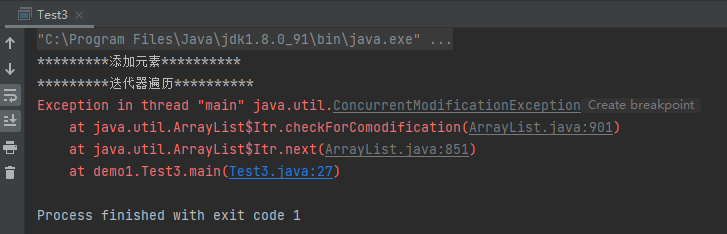
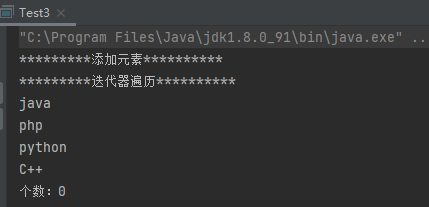
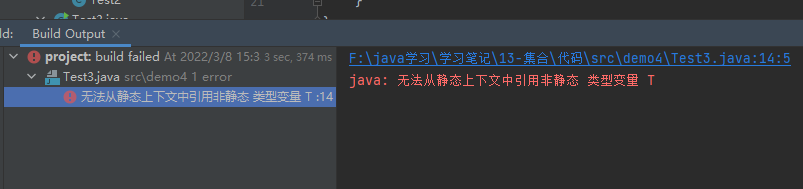
案例3:在迭代器中,如果移除元素,只能使用迭代器的方法,否则会抛出并发修改异常
1
2
3
4
5
6
7
8
9
10
11
12
13
14
15
16
17
18
19
20
21
22
public class Test3 public static void main (String[] args) System.out.println("*********添加元素**********" ); Collection collection = new ArrayList(); collection.add("java" ); collection.add("php" ); collection.add("python" ); collection.add("C++" ); System.out.println("*********迭代器遍历**********" ); Iterator iterator = collection.iterator(); while (iterator.hasNext()){ String s = (String) iterator.next(); iterator.remove(); System.out.println(s); } System.out.println("个数:" +collection.size()); } }
运行结果:
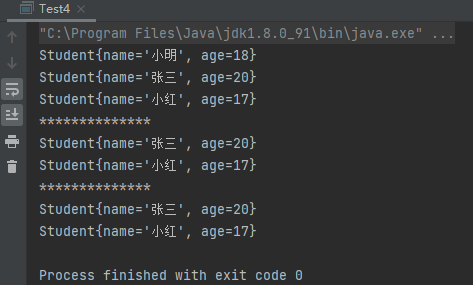
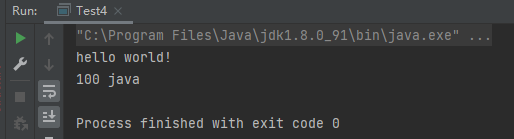
案例4:Collection中存储自定义类
1
2
3
4
5
6
7
8
9
10
11
12
13
14
15
16
17
18
19
20
21
22
23
24
25
26
27
28
29
30
31
32
33
34
35
36
37
38
39
40
41
42
43
44
45
46
47
48
49
50
51
52
53
54
55
56
57
58
59
60
61
62
63
64
65
66
67
68
public class Test4 public static void main (String[] args) Student s1 = new Student("小明" ,18 ); Student s2 = new Student("张三" ,20 ); Student s3 = new Student("小红" ,17 ); Collection collection = new ArrayList(); collection.add(s1); collection.add(s2); collection.add(s3); for (Object o : collection) { Student s = (Student) o; System.out.println(s); } System.out.println("**************" ); collection.remove(s1); for (Object o : collection) { Student s = (Student) o; System.out.println(s); } System.out.println("**************" ); collection.remove(new Student("张三" ,20 )); for (Object o : collection) { Student s = (Student) o; System.out.println(s); } } } class Student private String name; private int age; public Student () } public Student (String name, int age) this .name = name; this .age = age; } public String getName () return name; } public void setName (String name) this .name = name; } public int getAge () return age; } public void setAge (int age) this .age = age; } @Override public String toString () return "Student{" + "name='" + name + '\'' + ", age=" + age + '}' ; } }
运行结果:
从运行结果上看,第二个删除没有起作用。解决方式:重写equals()方法
1
2
3
4
5
6
7
@Override public boolean equals (Object o) if (this == o) return true ; if (o == null || getClass() != o.getClass()) return false ; Student student = (Student) o; return age == student.age && Objects.equals(name, student.name); }
运行结果:
Collection父接口没有下标,不能使用for循环遍历,只有两种遍历方式:1、增强for 2、迭代器
特点:有序、有下标、元素可以重复(有序就是添加的顺序与遍历的顺序是一致的)
方法:
方法
功能
void add(int index,Object o);在index位置插入对象o
boolean addAll(int index,Collection c);将一个集合中的元素添加到此集合中index位置
Object get(int index);返回集合中指定位置的元素
List subList(int fromIndex,int toIndex);返回fromIndex和toIndex之间的集合元素
ListIterator<E> listIterator();返回此列表元素的列表迭代器(按适当顺序)
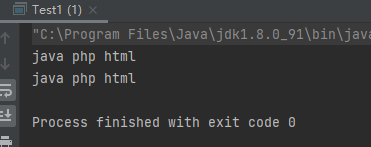
案例1:遍历方式for循环与增强for
1
2
3
4
5
6
7
8
9
10
11
12
13
14
15
16
17
18
19
20
21
22
23
24
public class Test1 public static void main (String[] args) List list = new ArrayList(); list.add("java" ); list.add("php" ); list.add("html" ); for (Object o : list) { String s = (String) o; System.out.print(s+" " ); } System.out.println(); for (int i = 0 ; i < list.size(); i++) { System.out.print(list.get(i)+" " ); } System.out.println(); } }
运行结果:
列表迭代器:
方法:比普通迭代器多了几个方法。
方法
功能
void add(E e);将指定的元素插入列表
boolean hasNext();以正向遍历列表时,如果列表迭代器有多个元素,则返回 true
boolean hasPrevious();如果以逆向遍历列表,列表迭代器有多个元素,则返回 true。
E next();返回列表中的下一个元素。
int nextIndex();返回列表中下一个元素的索引。
E previous();返回列表中的前一个元素。
int previousIndex();返回列表中的前一个元素的索引。
void remove();从列表中移除由 next 或 previous 返回的最后一个元素。
void set(E e);用指定元素替换 next 或 previous 返回的最后一个元素。
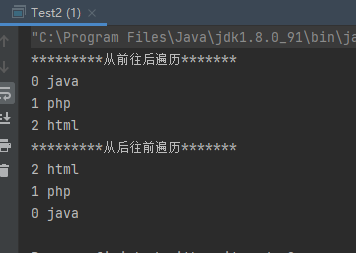
案例2:使用列表迭代器遍历
1
2
3
4
5
6
7
8
9
10
11
12
13
14
15
16
17
18
19
20
21
22
23
24
public class Test2 public static void main (String[] args) List list = new ArrayList(); list.add("java" ); list.add("php" ); list.add("html" ); ListIterator lit = list.listIterator(); System.out.println("*********从前往后遍历*******" ); while (lit.hasNext()){ System.out.println(lit.nextIndex()+" " +lit.next()); } System.out.println("*********从后往前遍历*******" ); while (lit.hasPrevious()){ System.out.println(lit.previousIndex()+" " +lit.previous()); } } }
运行结果:
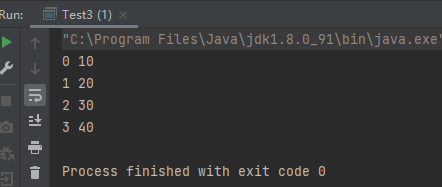
案例3:添加基本类型数据会自动装箱
1
2
3
4
5
6
7
8
9
10
11
12
13
14
15
16
17
18
19
20
public class Test3 public static void main (String[] args) List list = new ArrayList(); list.add(10 ); list.add(20 ); list.add(30 ); list.add(40 ); ListIterator lit = list.listIterator(); while (lit.hasNext()){ System.out.println(lit.nextIndex()+" " +lit.next()); } } }
运行结果:
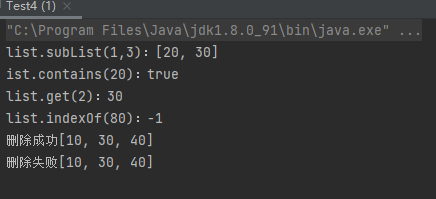
案例4:subList、contains等方法的使用
1
2
3
4
5
6
7
8
9
10
11
12
13
14
15
16
17
18
19
20
21
22
23
24
25
26
27
28
29
30
31
32
33
34
35
36
37
38
39
40
41
42
43
44
45
public class Test4 public static void main (String[] args) List list = new ArrayList(); list.add(10 ); list.add(20 ); list.add(30 ); list.add(40 ); List list1 = list.subList(1 ,3 ); System.out.println("list.subList(1,3):" +list1); boolean b1 = list.contains(20 ); System.out.println("ist.contains(20):" +b1); int n1 = (int ) list.get(2 ); System.out.println("list.get(2):" +n1); int n2 = list.indexOf(80 ); System.out.println("list.indexOf(80):" +n2); boolean b2 = list.remove((Integer) 20 ); System.out.print(b2 ? "删除成功" :"删除失败" ); System.out.println(list); boolean b3 = list.remove((Integer) 100 ); System.out.print(b3 ? "删除成功" :"删除失败" ); System.out.println(list); } }
运行结果:
ArrayList:
数组结构实现,查询快,增删慢
JDK1.2 版本,运行效率快、线程不安全
Vector:
数组接口实现,查询快、增删慢
JDK1.o 版本,运行效率慢、线程安全
LinkedList:
链表实现,查询慢、增删快
1
2
3
4
5
6
7
8
9
10
11
12
13
14
15
16
17
18
19
20
21
22
23
24
25
26
27
28
29
30
31
32
33
34
35
36
37
38
39
40
41
42
43
44
45
46
47
48
49
50
51
52
public class Test1 public static void main (String[] args) ArrayList list = new ArrayList(); list.add(new Student("小明" ,18 )); list.add(new Student("小红" ,17 )); list.add(new Student("张三" ,19 )); for (Object o : list) { Student student = (Student) o; System.out.print(student+" " ); } System.out.println(); boolean b1 = list.remove(new Student("张三" ,19 )); System.out.print(b1 ? "删除成功" :"删除失败" ); System.out.print(" " ); System.out.print("list.size()=" +list.size()); System.out.println(list); } } class Student private String name; private int age; public Student (String name, int age) this .name = name; this .age = age; } public Student () } @Override public String toString () return "Student{" + "name='" + name + '\'' + ", age=" + age + '}' ; } @Override public boolean equals (Object o) if (this == o) return true ; if (o == null || getClass() != o.getClass()) return false ; Student student = (Student) o; if (age != student.age) return false ; return Objects.equals(name, student.name); } }
运行结果:
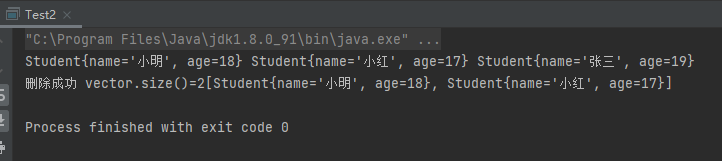
1
2
3
4
5
6
7
8
9
10
11
12
13
14
15
16
17
18
19
20
21
public class Test2 public static void main (String[] args) Vector vector = new Vector(); vector.add(new Student("小明" ,18 )); vector.add(new Student("小红" ,17 )); vector.add(new Student("张三" ,19 )); for (Object o : vector) { Student student = (Student) o; System.out.print(student+" " ); } System.out.println(); boolean b1 = vector.remove(new Student("张三" ,19 )); System.out.print(b1 ? "删除成功" :"删除失败" ); System.out.print(" " ); System.out.print("vector.size()=" +vector.size()); System.out.println(vector); } }
运行结果:
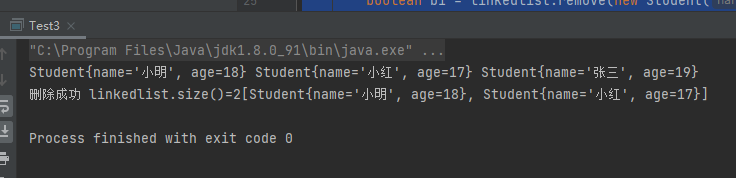
1
2
3
4
5
6
7
8
9
10
11
12
13
14
15
16
17
18
19
20
21
public class Test3 public static void main (String[] args) LinkedList linkedlist = new LinkedList(); linkedlist.add(new Student("小明" ,18 )); linkedlist.add(new Student("小红" ,17 )); linkedlist.add(new Student("张三" ,19 )); for (Object o : linkedlist) { Student student = (Student) o; System.out.print(student+" " ); } System.out.println(); boolean b1 = linkedlist.remove(new Student("张三" ,19 )); System.out.print(b1 ? "删除成功" :"删除失败" ); System.out.print(" " ); System.out.print("linkedlist.size()=" +linkedlist.size()); System.out.println(linkedlist); } }
运行结果:
ArrayList、Vector、LinkedList三个实现类实现方式不同,根据实际需求选择,其所拥有的方法大致相同。
ArrayList:必须开辟连续空间,查询快、增删慢。LinkedList:无序开辟连续空间,查询慢、增删快。
案例1:泛型类的使用
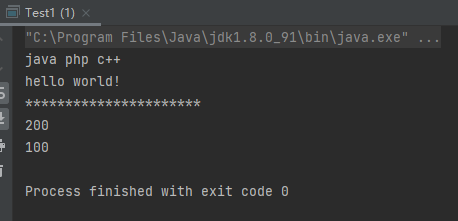
1 2 3 4 5 6 7 8 9 10 11 12 13 14 15 16 17 18 19 20 21 22 23 24 25 26 27 28 29 30 31 32 33 class MyGeneric <T > public T t; public void testMethod1 (T t) System.out.println(t); } public T getT () return this .t; } } public class Test1 public static void main (String[] args) MyGeneric<String> myGeneric1 = new MyGeneric<String>(); myGeneric1.t = "hello world!" ; myGeneric1.testMethod1("java php c++" ); String str = myGeneric1.getT(); System.out.println(str); System.out.println("**********************" ); MyGeneric<Integer> myGeneric2 = new MyGeneric<Integer>(); myGeneric2.t = 100 ; myGeneric2.testMethod1(200 ); int num = myGeneric2.getT(); System.out.println(num); } }
运行结果:
案例2:泛型接口
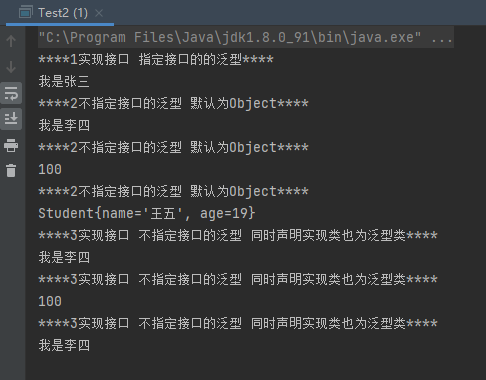
1 2 3 4 5 6 7 8 9 10 11 12 13 14 15 16 17 18 19 20 21 22 23 24 25 26 27 28 29 30 31 32 33 34 35 36 37 38 39 40 41 42 43 44 45 46 47 48 49 50 51 52 53 54 55 56 57 58 59 60 61 62 63 64 65 66 67 68 69 70 71 72 73 74 interface MyInterface <T > String STR = "hello" ; void testMethod1 (T t) } class MyInterfaceImpl1 implements MyInterface <String > @Override public void testMethod1 (String s) System.out.println("****1实现接口 指定接口的的泛型****" ); System.out.println(s); } } class MyInterfaceImpl2 implements MyInterface @Override public void testMethod1 (Object o) System.out.println("****2不指定接口的泛型 默认为Object****" ); System.out.println(o); } } class MyInterfaceImpl3 <E > implements MyInterface <E > @Override public void testMethod1 (E e) System.out.println("****3实现接口 不指定接口的泛型 同时声明实现类也为泛型类****" ); System.out.println(e); } } public class Test2 public static void main (String[] args) MyInterfaceImpl1 myInterfaceImpl1 = new MyInterfaceImpl1(); myInterfaceImpl1.testMethod1("我是张三" ); MyInterfaceImpl2 myInterfaceImpl2 = new MyInterfaceImpl2(); myInterfaceImpl2.testMethod1("我是李四" ); myInterfaceImpl2.testMethod1(100 ); myInterfaceImpl2.testMethod1(new Student("王五" ,19 )); MyInterfaceImpl3 interfaceImpl3 = new MyInterfaceImpl3<>(); interfaceImpl3.testMethod1("我是李四" ); interfaceImpl3.testMethod1(100 ); MyInterfaceImpl3<String> interfaceImpl4 = new MyInterfaceImpl3<>(); interfaceImpl4.testMethod1("我是李四" ); } } class Student private String name; private int age; public Student (String name, int age) this .name = name; this .age = age; } public Student () } @Override public String toString () return "Student{" + "name='" + name + '\'' + ", age=" + age + '}' ; } }
运行结果:
案例3:泛型接口不能创建泛型静态常量
1 2 3 4 5 6 7 8 interface MyInterface1 <T > String STR = "hello" ; T STR_T = "java" ; void testMethod1 (T t) }
运行结果:
这是因为泛型,未被实现,类型不确定。
泛型方法:
语法:在返回值前加尖括号<>声明
案例4:泛型方法
1 2 3 4 5 6 7 8 9 10 11 12 13 14 15 16 public class Test4 public static <T> void test1 (T t,String str) System.out.println(t+" " +str); } public static void main (String[] args) Test4.test1("hello" ,"world!" ); Test4.test1(100 ,"java" ); } }
运行结果:
能够检查存入集合的数据是否与预设的一致
编译时即可检查,而不是在运行时抛出异常
遍历集合元素时,不用类型转换(拆箱)
不同泛型之间引用不能相互赋值,泛型不存在多态
1 2 3 4 5 6 7 8 9 public class Test5 public static void main (String[] args) Collection<String> collection= new ArrayList<>(); collection.add("hello" ); collection.add("java" ); collection.add("php" ); collection.add(123 ); } }
运行结果:
检查数据类型一致性。
特点:无序、无下标、元素不可重复
方法:全部继承自Collection中的方法
使用foreach循环遍历:
案例1:
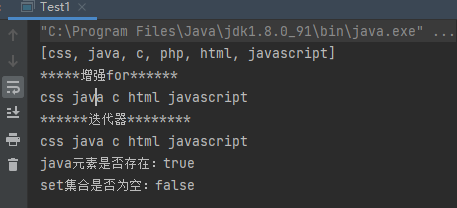
1 2 3 4 5 6 7 8 9 10 11 12 13 14 15 16 17 18 19 20 21 22 23 24 25 26 27 28 29 30 31 32 33 34 35 36 public class Test1 public static void main (String[] args) Set<String> set = new HashSet<>(); set.add("java" ); set.add("php" ); set.add("html" ); set.add("c" ); set.add("javascript" ); set.add("css" ); System.out.println(set); set.remove("php" ); System.out.println("*****增强for******" ); for (String s : set) { System.out.print(s+" " ); } System.out.println(); System.out.println("******迭代器********" ); Iterator<String> it = set.iterator(); while (it.hasNext()){ System.out.print(it.next()+" " ); } System.out.println(); System.out.println("java元素是否存在:" +set.contains("java" )); System.out.println("set集合是否为空:" +set.isEmpty()); } }
运行结果:Set集合是无序的,可以发现打印的值与添加数据的顺序不一致。
案例2:Set集合是不能重复的
1 2 3 4 5 6 7 8 9 10 11 12 13 14 15 public class Test2 public static void main (String[] args) Set<String> set = new HashSet<>(); set.add("java" ); set.add("php" ); set.add("php" ); set.add("php" ); set.add("php" ); set.add("php" ); set.add("php" ); System.out.println(set); } }
运行结果:
可以发现,虽然添加了许多php,但是set集合中只有一个php。
HashSet:
基于HashCode实现元素不重复
当存入元素的哈希码相同时,会调用==或equals进行确认,结果为true,拒绝后者存入
LinkedHashSet:
链表实现的HashSet,按照链表进行存储,可保留元素插入顺序
TreeSet:
基于排序顺序实现元素不重复
实现了SortedSet接口,对集合元素自动排序
元素对象的类型必须实现Comparable接口,指定排序规则
通过CompareTo方法确认是否为重复元素
存储结构:哈希表(数组+链表 JKD1.7之前 数组+链表+红黑树 JDK1.8之后)
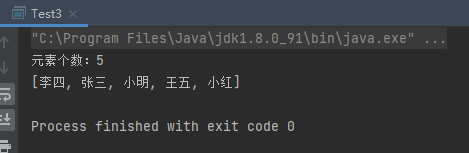
1 2 3 4 5 6 7 8 9 10 11 12 13 14 15 16 17 18 19 public class Test3 public static void main (String[] args) HashSet<String> hashSet = new HashSet<>(); hashSet.add("小明" ); hashSet.add("小红" ); hashSet.add("张三" ); hashSet.add("李四" ); hashSet.add("王五" ); hashSet.add("王五" ); System.out.println("元素个数:" +hashSet.size()); System.out.println(hashSet); } }
运行结果:
可以看出集合中元素与插入的顺序没有关系,这就是Set的特点,HashSet继承了Set,所以也继承了Set的特点,并且元素是不能重复的,添加了两个"王五"但是只能插入进一个。
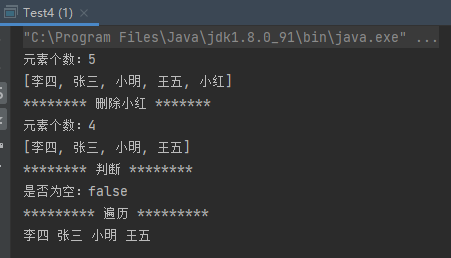
1 2 3 4 5 6 7 8 9 10 11 12 13 14 15 16 17 18 19 20 21 22 23 24 25 26 27 28 29 30 public class Test4 public static void main (String[] args) HashSet<String> hashSet = new HashSet<>(); hashSet.add("小明" ); hashSet.add("小红" ); hashSet.add("张三" ); hashSet.add("李四" ); hashSet.add("王五" ); System.out.println("元素个数:" +hashSet.size()); System.out.println(hashSet); System.out.println("******** 删除小红 *******" ); hashSet.remove("小红" ); System.out.println("元素个数:" +hashSet.size()); System.out.println(hashSet); System.out.println("******** 判断 ********" ); System.out.println("是否为空:" +hashSet.isEmpty()); System.out.println("********* 遍历 *********" ); Iterator<String> iterator = hashSet.iterator(); while (iterator.hasNext()){ System.out.print(iterator.next()+" " ); } System.out.println(); } }
运行结果:
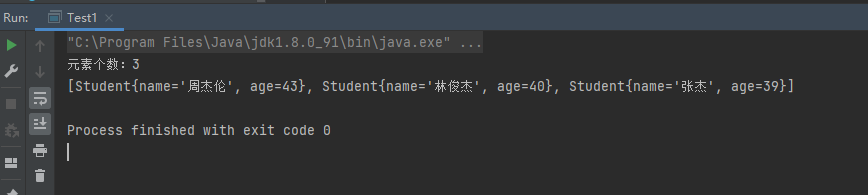
1 2 3 4 5 6 7 8 9 10 11 12 13 14 15 16 17 18 19 20 21 22 23 24 25 26 27 28 29 30 31 32 33 public class Test5 public static void main (String[] args) HashSet<Student> hashSet = new HashSet<>(); Student s1 = new Student("周杰伦" ,43 ); Student s2 = new Student("林俊杰" ,40 ); Student s3 = new Student("张杰" ,39 ); hashSet.add(s1); hashSet.add(s2); hashSet.add(s3); System.out.println(hashSet); } } class Student private String name; private int age; public Student (String name, int age) this .name = name; this .age = age; } @Override public String toString () return "Student{" + "name='" + name + '\'' + ", age=" + age + '}' ; } }
运行结果:
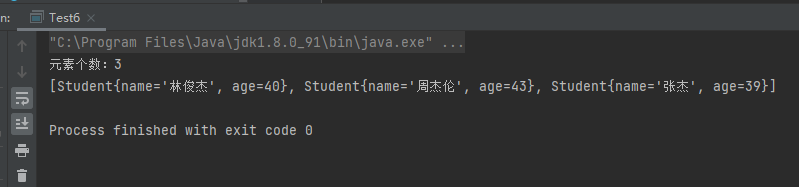
1 2 3 4 5 6 7 8 9 10 11 12 13 14 15 16 17 public class Test6 public static void main (String[] args) HashSet<Student> hashSet = new HashSet<>(); Student s1 = new Student("周杰伦" ,43 ); Student s2 = new Student("林俊杰" ,40 ); Student s3 = new Student("张杰" ,39 ); hashSet.add(s1); hashSet.add(s2); hashSet.add(s3); hashSet.add(s3); System.out.println("元素个数:" +hashSet.size()); System.out.println(hashSet); } }
运行结果:
通过结果可以看到,插入两个s3成功插入了1个。
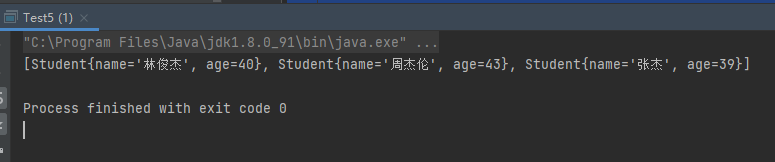
1 2 3 4 5 6 7 8 9 10 11 12 13 14 15 16 17 public class Test7 public static void main (String[] args) HashSet<Student> hashSet = new HashSet<>(); Student s1 = new Student("周杰伦" ,43 ); Student s2 = new Student("林俊杰" ,40 ); Student s3 = new Student("张杰" ,39 ); hashSet.add(s1); hashSet.add(s2); hashSet.add(s3); hashSet.add(new Student("张杰" ,39 )); System.out.println("元素个数:" +hashSet.size()); System.out.println(hashSet); } }
运行结果:
通过结果可以看到,插入两个new Student("张杰",39),都成功插入了。
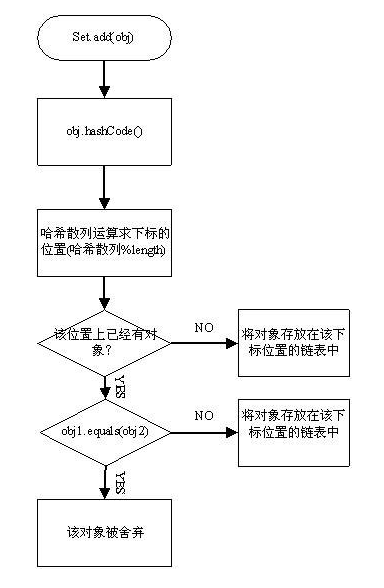
HashSet的存储原理或者工作原理,主要是从如何保证唯一性来说起。
这里面主要有3个问题,需要回答?
第一,为什么要采用Hash算法?有什么优势,解决了什么问题?
第二,所谓哈希表是一张什么表?
第三,HashSet如何保证保存对象的唯一性?会经历一个什么样的运算过程?
首先,我们要明确一点,HashSet底层采用的是HashMap来实现存储,其值作为HashMap的key
1 2 3 public boolean add (E e) return map.put(e, PRESENT)==null ; }
具体关于hashmap的细节再说
第一,为什么要采用Hash算法?有什么优势,解决了什么问题?
解决的问题是唯一性
存储数据,底层采用的是数组
当我们往数组放数据的时候,你如何判断是否唯一?
可以采用遍历的方式,逐个比较,但是这种效率低,尤其是数据很多的情况下
所以,为了解决这个效率低的问题,我们采用新的方式
采用hash算法,通过计算存储对象的hashcode,然后再跟数组长度-1做位运算,得到我们要存储在数组的哪个下标下,如果此时计算的位置没有其他元素,直接存储,不用比较。
此处,我们只会用到hashCode
但是随着元素的不断添加,就可能出现“哈希冲突”,不同的对象计算出来的hash值是相同的,这个时候,我们就需要比较,才需要用到equals方法
如果equals相同,则不插入,不相等,则形成链表
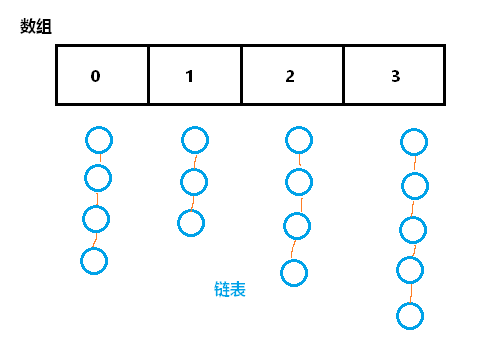
第二,所谓哈希表是一张什么表?
本质是一个数组,而且数组的元素是链表,类似多个售票窗口排了很多的人。如下图,
JDK1.7的版本实现,JDK1.8做了优化,随着元素不断添加,链表可能会越来越长,会优化红黑树。
所以对于案例4与案例5的情况,案例4中没有插入进去,而案例5中插入进去了,这是因为我们没有重写hashcode与equals方法,默认hashcode是根据对象的引用地址生成的,equals比较的是对象的引用。
1 2 3 4 public native int hashCode () public boolean equals (Object obj) return (this == obj); }
案例4:对于案例4中由于添加的是s1,两个s1的引用地址是一致的,首先通过hashcode方法计算出了位置,易知两次位置时一致的,所以又会调用equals方法,比较两个s1,显而易见是相等的,于是拒绝插入 。
案例5:对于案例5由于第一次添加的是s1,第二次添加的是新建的对象new Student("张杰",39),这两个对象的引用是不一样的,通过hashcode计算出的下标位置可能一致,就算一致,后面通过equals方法比较,结果一定是不相等的,因为默认equals方法比较的对象引用,所以这个对象就能够添加进入 。
那么对于案例5,我们要怎么才能够让其不能插入了?
这就需要我们重写Student类的hashcode和equals方法了。
1 2 3 4 5 6 7 8 9 10 11 12 13 14 15 16 17 18 19 20 21 22 23 24 25 26 27 28 29 30 31 32 33 34 35 36 37 38 39 40 41 42 43 44 45 46 47 48 49 50 51 52 public class Test1 public static void main (String[] args) HashSet<Student> hashSet = new HashSet<>(); Student s1 = new Student("周杰伦" ,43 ); Student s2 = new Student("林俊杰" ,40 ); Student s3 = new Student("张杰" ,39 ); hashSet.add(s1); hashSet.add(s2); hashSet.add(s3); hashSet.add(new Student("张杰" ,39 )); System.out.println("元素个数:" +hashSet.size()); System.out.println(hashSet); } } class Student private String name; private int age; public Student (String name, int age) this .name = name; this .age = age; } @Override public String toString () return "Student{" + "name='" + name + '\'' + ", age=" + age + '}' ; } @Override public boolean equals (Object o) if (this == o) return true ; if (o == null || getClass() != o.getClass()) return false ; Student student = (Student) o; if (age != student.age) return false ; return Objects.equals(name, student.name); } @Override public int hashCode () int result = name != null ? name.hashCode() : 0 ; result = 31 * result + age; return result; } }
运行结果:
结果中new Student("张杰",39)没有插入
1 2 3 4 5 6 @Override public int hashCode () int result = name != null ? name.hashCode() : 0 ; result = 31 * result + age; return result; }
31是一个质数,可以减少散列冲突。31可提高效率,31*i=(i<<5)-i,31乘以i与i左移5位减i的值相等。
基于排列顺序实现元素不重复。
实现了SortedSet接口,对集合元素自动排序。
元素对象的类型必须实现Comparable接口,指定排序规则,或者定制排序规则。
通过CompareTo方法确定是否为重复元素。
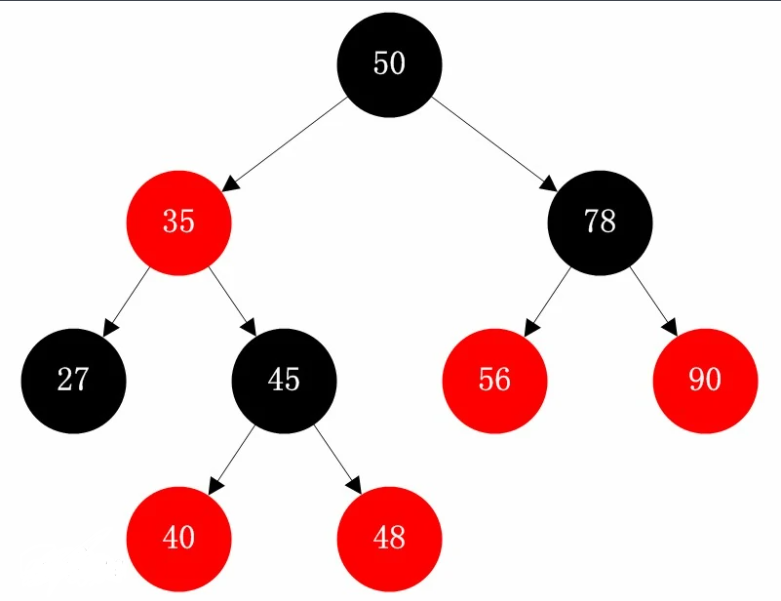
TreeSet存储结构是红黑树:红黑树的特点是结点左边的叶子大于结点右边的叶子
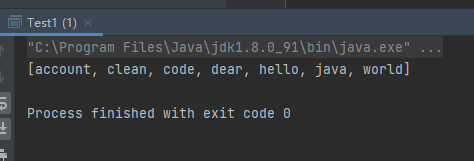
1 2 3 4 5 6 7 8 9 10 11 12 13 public class Test1 public static void main (String[] args) TreeSet<String> treeSet = new TreeSet<>(); treeSet.add("code" ); treeSet.add("account" ); treeSet.add("dear" ); treeSet.add("clean" ); treeSet.add("hello" ); treeSet.add("world" ); treeSet.add("java" ); System.out.println(treeSet); } }
运行结果:
打印结果中,字符串按照排序从小到大进行排列打印。这是TreeSet在存储元素中,是通过比较元素大小进行存储,底层维护的是红黑树,通过大小找到合适的结点插入。当取出数据的时候,循环找到合适的元素使元素按照从小到达进行打印输出。
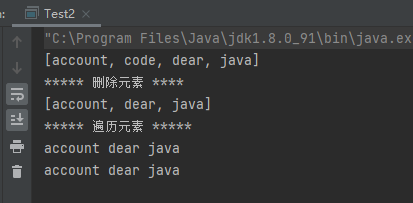
1 2 3 4 5 6 7 8 9 10 11 12 13 14 15 16 17 18 19 20 21 22 23 24 25 public class Test2 public static void main (String[] args) TreeSet<String> treeSet = new TreeSet<>(); treeSet.add("code" ); treeSet.add("account" ); treeSet.add("dear" ); treeSet.add("java" ); System.out.println(treeSet); System.out.println("***** 删除元素 ****" ); treeSet.remove("code" ); System.out.println(treeSet); System.out.println("***** 遍历元素 *****" ); for (String s : treeSet) { System.out.print(s+" " ); } System.out.println(); Iterator<String> it = treeSet.iterator(); while (it.hasNext()){ System.out.print(it.next()+" " ); } System.out.println(); } }
运行结果:
1 2 3 4 5 6 7 8 9 10 11 12 13 14 15 public class Test3 public static void main (String[] args) TreeSet<Person> treeSet = new TreeSet<>(); Person p1 = new Person("luck" ,18 ); Person p2 = new Person("mick" ,19 ); Person p3 = new Person("xiaoming" ,17 ); Person p4 = new Person("lily" ,21 ); Person p5 = new Person("mick" ,16 ); treeSet.add(p1); treeSet.add(p2); treeSet.add(p3); treeSet.add(p4); System.out.println(treeSet); } }
运行结果:
这是因为自定义类中没有实现comparable比较方法,而TreeSet是基于比较进行插入的。
实现comparable方法
Person.java
1 2 3 4 5 6 7 8 9 10 11 12 13 14 15 16 17 18 19 20 21 22 23 24 25 public class Person implements Comparable <Person > private String name; private int age; public Person (String name, int age) this .name = name; this .age = age; } @Override public int compareTo (Person o) int n1 = name.compareTo(o.name); int n2 = age - o.age; return n1==0 ? n2 : n1; } @Override public String toString () return "Person{" + "name='" + name + '\'' + ", age=" + age + '}' ; } }
运行结果:
先按照姓名排序,再按照年龄排序。
实现comparable方法后,treeSet.remove(new Person("mick",16));这种方式的操作可也成功,这是因为当comparable返回值为0时,即两个对象判断为相同。
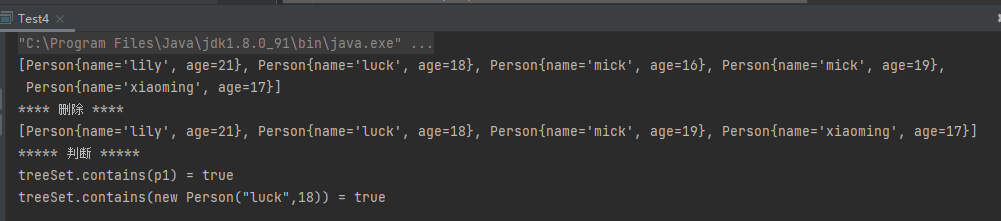
1 2 3 4 5 6 7 8 9 10 11 12 13 14 15 16 17 18 19 20 21 22 public class Test4 public static void main (String[] args) TreeSet<Person> treeSet = new TreeSet<>(); Person p1 = new Person("luck" ,18 ); Person p2 = new Person("mick" ,19 ); Person p3 = new Person("xiaoming" ,17 ); Person p4 = new Person("lily" ,21 ); Person p5 = new Person("mick" ,16 ); treeSet.add(p1); treeSet.add(p2); treeSet.add(p3); treeSet.add(p4); treeSet.add(p5); System.out.println(treeSet); System.out.println("**** 删除 ****" ); treeSet.remove(new Person("mick" ,16 )); System.out.println(treeSet); System.out.println("***** 判断 *****" ); System.out.println("treeSet.contains(p1) = " + treeSet.contains(p1)); System.out.println("treeSet.contains(new Person(\"luck\",18)) = " + treeSet.contains(new Person("luck" , 18 ))); } }
运行结果:
通过创建TreeSet对象时,传入比较器接口Comparator的实现类。可使用匿名内部类
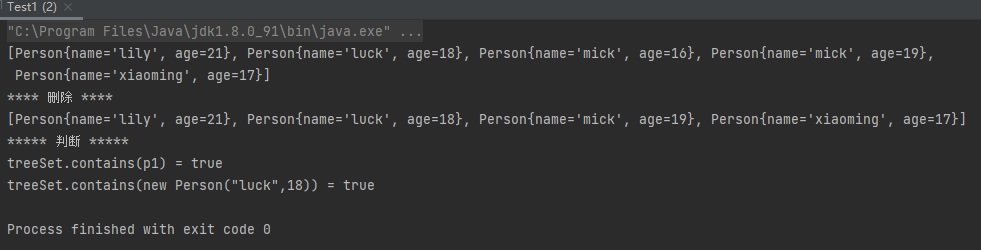
1 2 3 4 5 6 7 8 9 10 11 12 13 14 15 16 17 18 19 20 21 22 23 24 25 26 27 28 29 30 31 32 33 34 35 36 37 38 39 40 41 42 43 44 45 46 class Person public String name; public int age; public Person (String name, int age) this .name = name; this .age = age; } @Override public String toString () return "Person{" + "name='" + name + '\'' + ", age=" + age + '}' ; } } public class Test1 public static void main (String[] args) TreeSet<Person> treeSet = new TreeSet<>(new Comparator<Person>() { @Override public int compare (Person o1, Person o2) int n1 = o1.name.compareTo(o2.name); int n2 = o1.age - o2.age; return n1==0 ? n2 : n1; } }); Person p1 = new Person("luck" ,18 ); Person p2 = new Person("mick" ,19 ); Person p3 = new Person("xiaoming" ,17 ); Person p4 = new Person("lily" ,21 ); Person p5 = new Person("mick" ,16 ); treeSet.add(p1); treeSet.add(p2); treeSet.add(p3); treeSet.add(p4); treeSet.add(p5); System.out.println(treeSet); System.out.println("**** 删除 ****" ); treeSet.remove(new Person("mick" ,16 )); System.out.println(treeSet); System.out.println("***** 判断 *****" ); System.out.println("treeSet.contains(p1) = " + treeSet.contains(p1)); System.out.println("treeSet.contains(new Person(\"luck\",18)) = " + treeSet.contains(new Person("luck" , 18 ))); } }
运行结果:
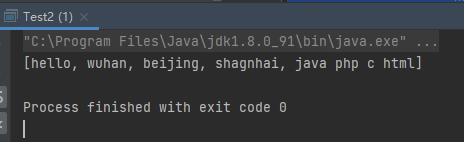
1 2 3 4 5 6 7 8 9 10 11 12 13 14 15 16 17 18 19 20 21 22 public class Test2 public static void main (String[] args) TreeSet<String> treeSet = new TreeSet<>(new Comparator<String>() { @Override public int compare (String o1, String o2) int n1 = o1.length() - o2.length(); int n2 = o1.compareTo(o2); return n1==0 ? n2 : n1; } }); treeSet.add("hello" ); treeSet.add("shagnhai" ); treeSet.add("beijing" ); treeSet.add("wuhan" ); treeSet.add("java php c html" ); System.out.println(treeSet); } }
运行结果:
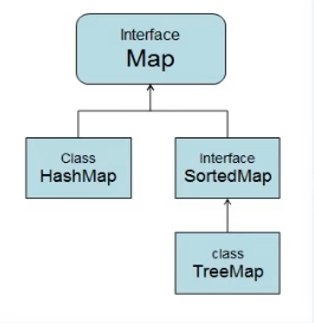
特点:存储一对数据(键值对key-value),无序、无下标,键不能重复,值可以重复。
方法:
方法名
功能
V put(K key,V value);将对象存入到集合中,关联键值。key重复的则覆盖原值。
Object get(Object key);根据键获取对应的值。
Set<K> keySet();返回所有的Key。
Collection<V> values();返回包含所有值的Collection集合。
Set<Map.Entry<K,V>> entrySet();返回键值匹配的Set集合。
1 2 3 4 5 6 7 8 9 10 11 12 13 14 15 16 17 public class Test1 public static void main (String[] args) Map<String,String> map = new HashMap<>(); map.put("cn" ,"中国" ); map.put("uk" ,"英国" ); map.put("usa" ,"美国" ); System.out.println("元素个数: " + map.size()); System.out.println("map = " + map); } }
运行结果:
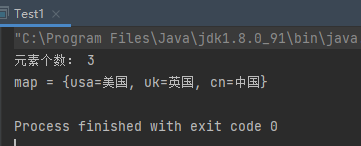
1 2 3 4 5 6 7 8 9 10 11 12 13 14 15 16 17 18 19 20 21 public class Test2 public static void main (String[] args) Map<String,String> map = new HashMap<>(); map.put("cn" ,"中国" ); map.put("uk" ,"英国" ); map.put("usa" ,"美国" ); System.out.println("元素个数: " + map.size()); System.out.println("map = " + map); map.put("cn" ,"中国1" ); System.out.println("map = " + map); map.put("cn" ,"中国2" ); System.out.println("map = " + map); } }
运行结果:
原来的值被新的值所覆盖。
1 2 3 4 5 6 7 8 9 10 11 12 13 14 15 16 17 18 19 20 21 22 23 24 25 26 27 28 public class Test3 public static void main (String[] args) Map<String,String> map = new HashMap<>(); map.put("cn" ,"中国" ); map.put("uk" ,"英国" ); map.put("usa" ,"美国" ); System.out.println("元素个数: " + map.size()); Set<String> keySet = map.keySet(); for (String key : keySet) { System.out.print(key + ":" + map.get(key)+" " ); } System.out.println(); Set<Map.Entry<String,String>> entrySet = map.entrySet(); for (Map.Entry<String, String> entry : entrySet) { System.out.print(entry+" " ); } System.out.println(); for (Map.Entry<String, String> entry : entrySet) { System.out.print(entry.getKey()+":" +entry.getValue()+" " ); } } }
运行结果:
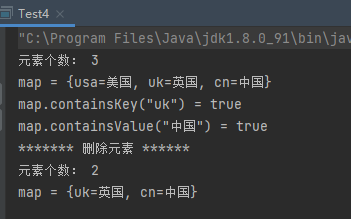
1 2 3 4 5 6 7 8 9 10 11 12 13 14 15 16 17 18 19 20 21 22 23 public class Test4 public static void main (String[] args) Map<String,String> map = new HashMap<>(); map.put("cn" ,"中国" ); map.put("uk" ,"英国" ); map.put("usa" ,"美国" ); System.out.println("元素个数: " + map.size()); System.out.println("map = " + map); System.out.println("map.containsKey(\"uk\") = " + map.containsKey("uk" )); System.out.println("map.containsValue(\"中国\") = " + map.containsValue("中国" )); System.out.println("******* 删除元素 ******" ); map.remove("usa" ); System.out.println("元素个数: " + map.size()); System.out.println("map = " + map); } }
运行结果:
jdk1.2 版本,线程不安全,运行效率快,运行使用null作为key或者value。
1 2 3 4 5 6 7 8 9 10 11 12 13 14 15 16 17 18 public class Test1 public static void main (String[] args) HashMap<Person,String> hashMap = new HashMap<>(); Person p1 = new Person("小明" ,19 ); Person p2 = new Person("小红" ,20 ); Person p3 = new Person("张三" ,18 ); hashMap.put(p1,"北京" ); hashMap.put(p2,"上海" ); hashMap.put(p3,"武汉" ); System.out.println("hashMap = " + hashMap); } }
运行结果:
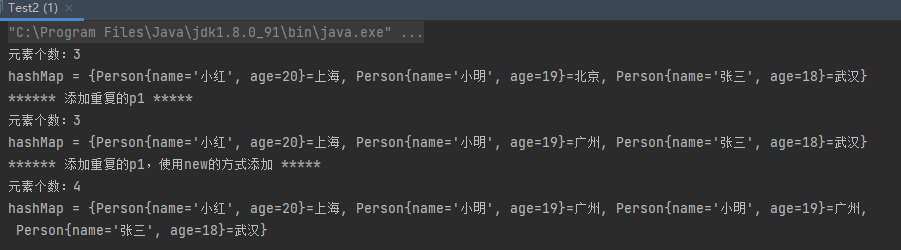
1 2 3 4 5 6 7 8 9 10 11 12 13 14 15 16 17 18 19 20 21 22 23 24 25 26 27 28 public class Test2 public static void main (String[] args) HashMap<Person,String> hashMap = new HashMap<>(); Person p1 = new Person("小明" ,19 ); Person p2 = new Person("小红" ,20 ); Person p3 = new Person("张三" ,18 ); hashMap.put(p1,"北京" ); hashMap.put(p2,"上海" ); hashMap.put(p3,"武汉" ); System.out.println("元素个数:" +hashMap.size()); System.out.println("hashMap = " + hashMap); System.out.println("****** 添加重复的p1 *****" ); hashMap.put(p1,"广州" ); System.out.println("元素个数:" +hashMap.size()); System.out.println("hashMap = " + hashMap); System.out.println("****** 添加重复的p1,使用new的方式添加 *****" ); hashMap.put(new Person("小明" ,19 ),"广州" ); System.out.println("元素个数:" +hashMap.size()); System.out.println("hashMap = " + hashMap); } }
运行结果:
可以发现使用已创建的p1进行添加,无法添加进去;而使用新创建的对象new Person("小明",19)添加进去了,那如何阻止其添加进去了,这需要我们重写hashcode与equals方法。
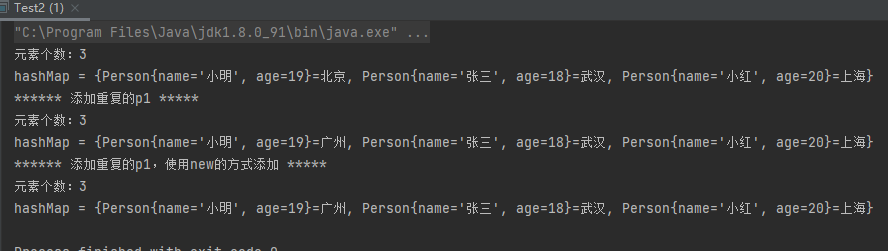
1 2 3 4 5 6 7 8 9 10 11 12 13 14 15 16 17 @Override public boolean equals (Object o) if (this == o) return true ; if (o == null || getClass() != o.getClass()) return false ; Person person = (Person) o; if (age != person.age) return false ; return Objects.equals(name, person.name); } @Override public int hashCode () int result = name != null ? name.hashCode() : 0 ; result = 31 * result + age; return result; }
运行结果:
使用new新建对象的方式,也阻止了插入。
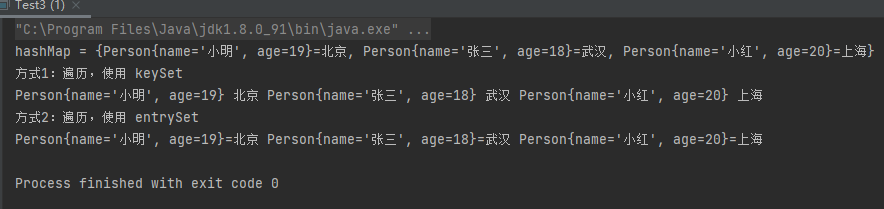
1 2 3 4 5 6 7 8 9 10 11 12 13 14 15 16 17 18 19 20 21 22 23 24 25 26 27 28 29 30 31 public class Test3 public static void main (String[] args) HashMap<Person,String> hashMap = new HashMap<>(); Person p1 = new Person("小明" ,19 ); Person p2 = new Person("小红" ,20 ); Person p3 = new Person("张三" ,18 ); hashMap.put(p1,"北京" ); hashMap.put(p2,"上海" ); hashMap.put(p3,"武汉" ); System.out.println("hashMap = " + hashMap); System.out.println("方式1:遍历,使用 keySet" ); Set<Person> keySet = hashMap.keySet(); for (Person key : keySet) { System.out.print(key + " " + hashMap.get(key) + " " ); } System.out.println(); System.out.println("方式2:遍历,使用 entrySet" ); Set<Map.Entry<Person, String>> entrySet = hashMap.entrySet(); for (Map.Entry<Person, String> entry : entrySet) { System.out.print(entry+" " ); } System.out.println(); } }
运行结果:
1 2 3 4 5 6 7 8 9 10 11 12 13 14 15 16 17 18 19 20 21 22 23 24 25 26 public class Test5 public static void main (String[] args) HashMap<Person,String> hashMap = new HashMap<>(); Person p1 = new Person("小明" ,19 ); Person p2 = new Person("小红" ,20 ); Person p3 = new Person("张三" ,18 ); hashMap.put(p1,"北京" ); hashMap.put(p2,"上海" ); hashMap.put(p3,"武汉" ); System.out.println("hashMap = " + hashMap); System.out.println("判断是否存在指定key" ); System.out.println("hashMap.containsKey(p1) = " + hashMap.containsKey(p1)); System.out.println("hashMap.containsKey(new Person(\"小明\",19)) = " + hashMap.containsKey(new Person("小明" , 19 ))); System.out.println("判断是否存在指定value" ); System.out.println("hashMap.containsValue(\"上海\") = " + hashMap.containsValue("上海" )); System.out.println("判断是否为空" ); System.out.println("hashMap.isEmpty() = " + hashMap.isEmpty()); } }
运行结果:
jdk1.0 版本,线程安全,运行效率慢,不允许使用null作为key或value,现在基本不用,但是它有一个子类Properties,经常会被用到。
Hashtable子类,要求key和value都是String,通常用于配置文件的读取。
实现了SortedMap接口(是Map的子接口),可以对key自动排序。
自定义类作为key,需要实现Comparable接口或定制比较器。
其遍历方式,插入删除判断操作方法与HashMap一致。
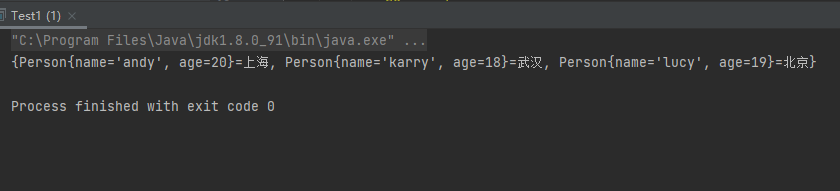
1 2 3 4 5 6 7 8 9 10 11 12 13 14 15 16 17 18 19 20 21 22 23 24 25 26 27 28 29 30 31 32 33 34 35 36 37 public class Test1 public static void main (String[] args) Person p1 = new Person("lucy" ,19 ); Person p2 = new Person("andy" ,20 ); Person p3 = new Person("karry" ,18 ); TreeMap<Person,String> treeMap = new TreeMap<>(); treeMap.put(p1,"北京" ); treeMap.put(p2,"上海" ); treeMap.put(p3,"武汉" ); System.out.println(treeMap); } } class Person implements Comparable <Person > private String name; private int age; public Person (String name, int age) this .name = name; this .age = age; } @Override public int compareTo (Person o) int n1 = name.compareTo(o.name); int n2 = age - o.age; return n1==0 ? n2 : n1; } @Override public String toString () return "Person{" + "name='" + name + '\'' + ", age=" + age + '}' ; } }
运行结果:
1 2 3 4 5 6 7 8 9 10 11 12 13 14 15 16 17 18 19 20 21 22 23 24 25 26 27 28 29 30 31 32 33 34 35 36 37 public class Test1 public static void main (String[] args) Person p1 = new Person("lucy" ,19 ); Person p2 = new Person("andy" ,20 ); Person p3 = new Person("karry" ,18 ); TreeMap<Person,String> treeMap = new TreeMap<>(new Comparator<Person>() { @Override public int compare (Person o1, Person o2) int n1 = o1.name.compareTo(o2.name); int n2 = o1.age - o2.age; return n1 == 0 ? n2 : n1; } }); treeMap.put(p1,"北京" ); treeMap.put(p2,"上海" ); treeMap.put(p3,"武汉" ); System.out.println(treeMap); } } class Person public String name; public int age; public Person (String name, int age) this .name = name; this .age = age; } @Override public String toString () return "Person{" + "name='" + name + '\'' + ", age=" + age + '}' ; } }
运行结果:
运行结果与案例1一致。
概念:集合工具类,定义了存了存取以外的集合常用方法
方法
功能
public static void reverse(List<?> list);反转集合中元素的顺序
public static void shuffle(List<?> list);随机重置集合中元素的顺序
public static void sort(List<?> list);升序排列集合中的元素。元素类型必须实现Comparable接口
static <T> int binarySearch(List<? extends Comparable<? super T>> list, T key)使用二分搜索法搜索指定列表,以获得指定对象。
等等,更多方法可查看JDK API文档。
集合转数组:List.toArray();
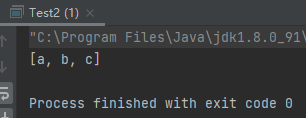
1 2 3 4 5 6 7 8 9 10 public class Test2 public static void main (String[] args) List<String> list = new ArrayList<String>(); list.add("a" ); list.add("b" ); list.add("c" ); String[] strArr = list.toArray(new String[0 ]); System.out.println(Arrays.toString(strArr)); } }
运行结果:
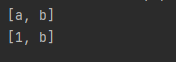
数组转集合:Arrays.asList();转换后的数组不允许增删改。
1 2 3 4 5 6 7 8 9 10 11 class Test public static void main (String[] args) String[] arr = {"a" ,"b" }; List<String> list= Arrays.asList(arr); System.out.println(list); list.set(0 ,"1" ); System.out.println(list); } }
运行结果:
注意:基本类型数组转为集合时,需要更改为包装类。
1
2
3
4
5
int [] nums = {10 ,20 ,30 };List<int []> list = Arrays.asList(nums); Integer[] nums = {10 ,20 ,30 }; List<Integer> list = Arrays.asList(nums);
集合的概念:对象的容器,定义了对多个对象进行操作的常用方法。
List集合:
有序、有下标、元素可以重复。(ArrayList、LinkedList、Vector)
Set集合:
无序、无下标、元素不可重复。(HashSet、TreeSet)
Map集合:
存储一对数据,无序、无下标,键不可重复,值可重复。(HashMap、HashTable、TreeMap)
Collections: